In This Article
The Swiss Cheese Plant: How to Grow and Care for Monstera Deliciosa
Welcome back to Plant It! If there is one plant that has completely dominated the interior design world, social media feeds, and the hearts of indoor gardeners everywhere, it is the spectacular Monstera deliciosa.
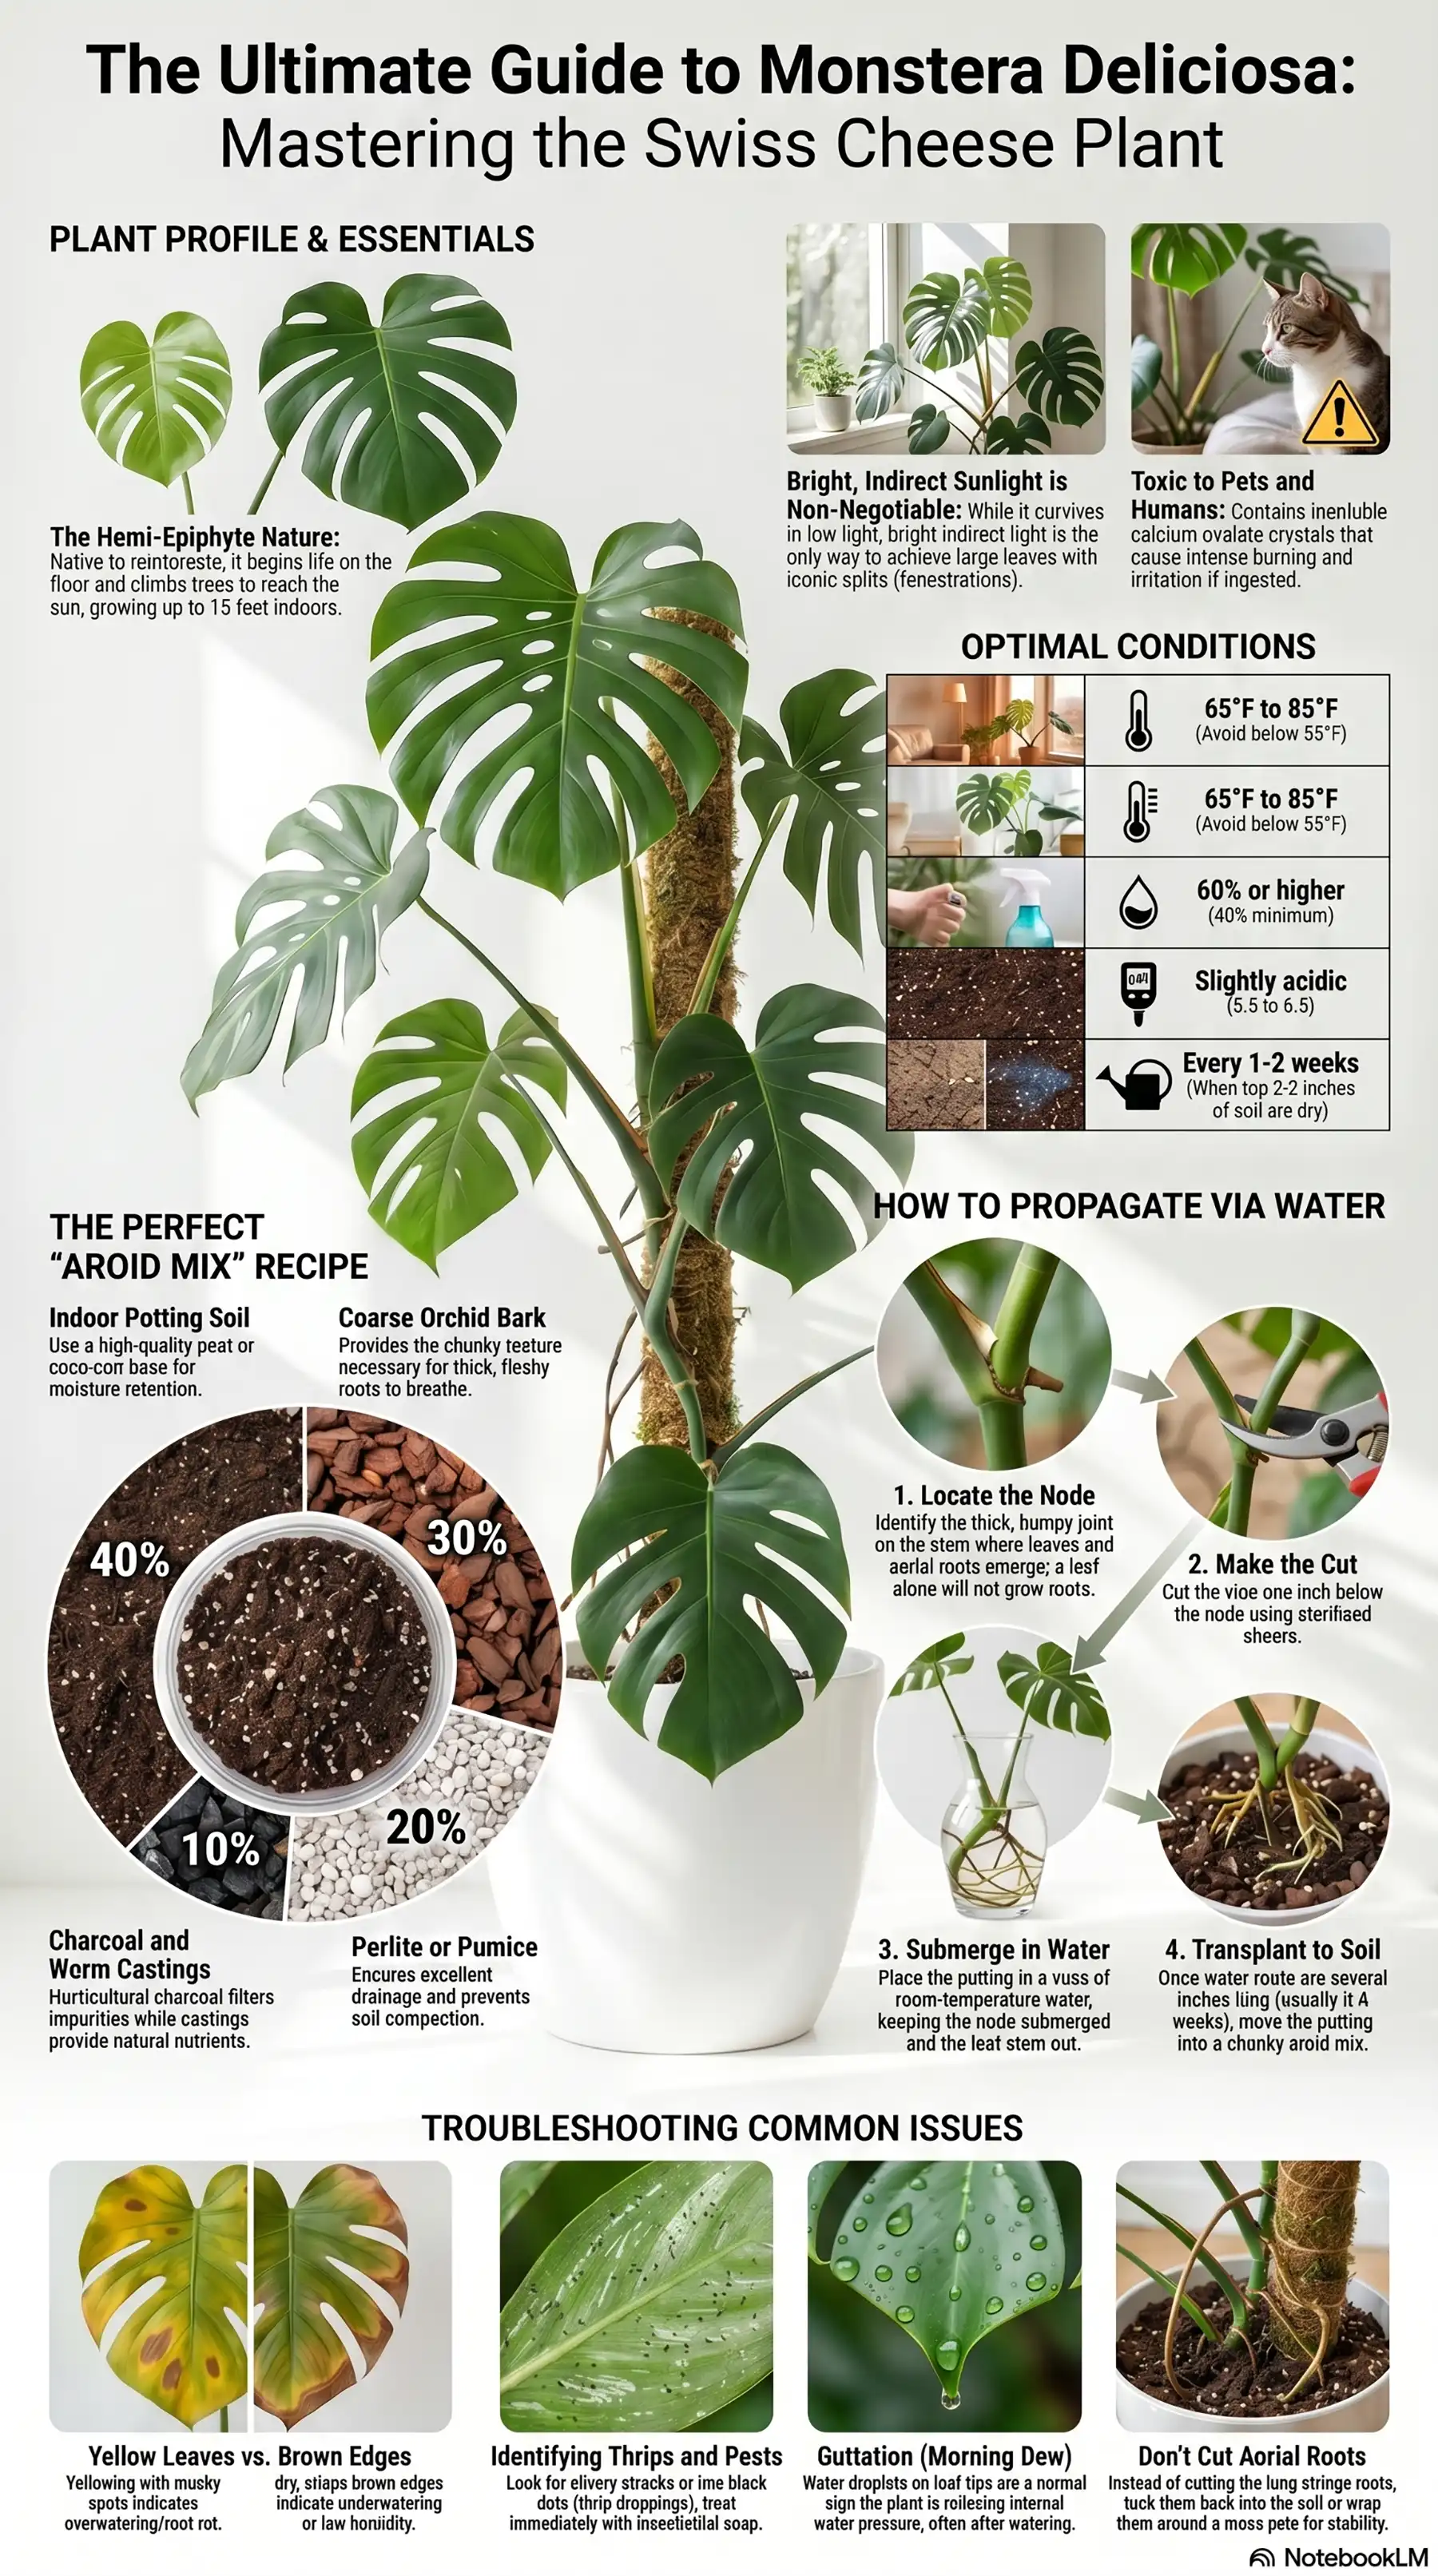
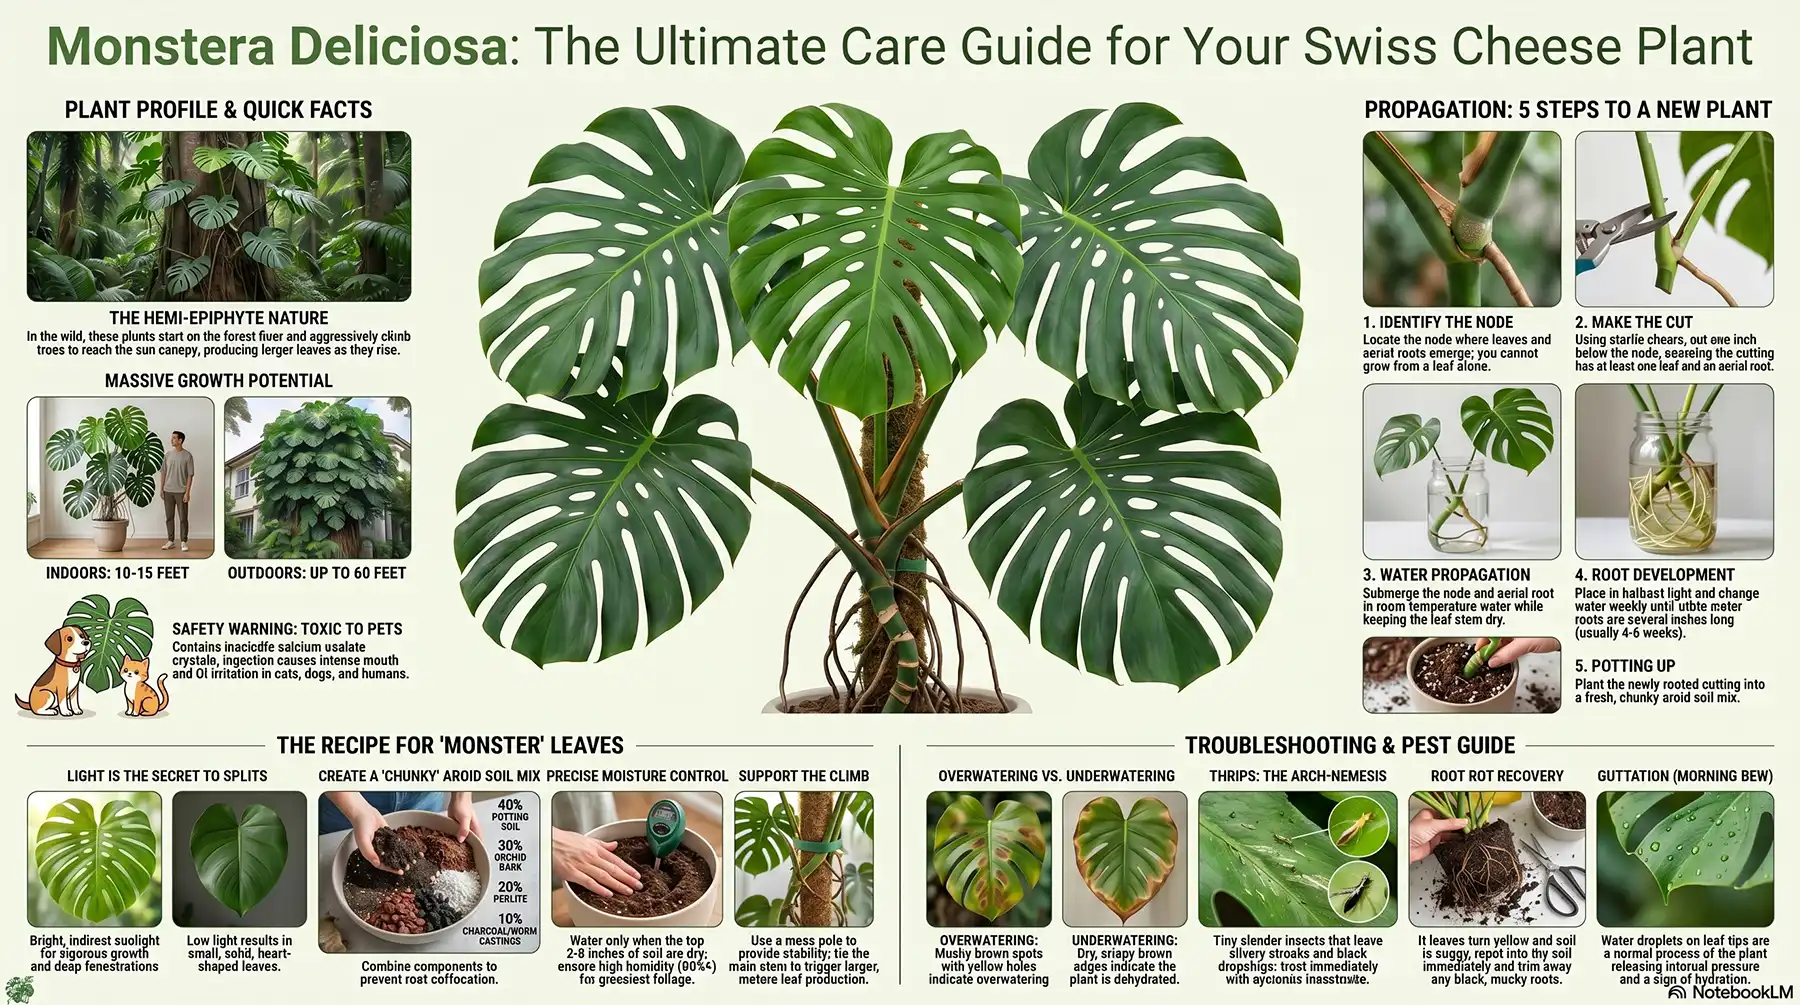
Affectionately known as the “Swiss Cheese Plant” due to the iconic, natural holes and splits in its massive leaves (a phenomenon scientifically known as fenestration), this tropical vining plant brings instant jungle vibes to any room. Native to the lush rainforests of southern Mexico and Central America, the Monstera is a hemi-epiphyte. This means it starts its life on the forest floor and aggressively climbs up the trunks of giant trees, pushing out larger, more heavily fenestrated leaves as it reaches toward the sun canopy.
Despite its exotic, architectural appearance, the Monstera Deliciosa is shockingly easy to grow indoors. It is robust, forgiving, and an incredibly fast grower under the right conditions. In this comprehensive, deep-dive guide, we will cover exactly how to care for your Monstera, how to multiply it, and how to troubleshoot common issues so you can cultivate a thriving, monster-sized statement plant.
Monstera Deliciosa Profile Quick Look
| Feature | Details |
| Common Name | Monstera, Swiss Cheese Plant, Split-Leaf Philodendron (misnomer) |
| Botanical Name | Monstera deliciosa |
| Plant Type | Tropical broadleaf evergreen vine |
| Mature Size | 10 to 15 feet indoors (up to 60 feet outdoors) |
| Sun Exposure | Bright, indirect sunlight |
| Soil Type | Peaty, chunky, well-draining aroid mix |
| Soil pH | Slightly acidic (5.5 to 6.5) |
| Toxicity | Toxic to cats, dogs, and humans if ingested |
| Native Area | Central America, Southern Mexico |
Essential Monstera Deliciosa Care
To get those massive, Pinterest-worthy leaves, you need to replicate the humid, dappled light of the tropical rainforest floor.
Light Requirements: The Secret to Leaf Splits
If you are wondering how to get more holes in monstera leaves, the answer is almost always light. While a Monstera can survive in a low-light corner, it will only produce small, solid, heart-shaped leaves.
To encourage vigorous growth and intense fenestration, place your Monstera in bright, indirect sunlight. A few feet back from a large south-facing or west-facing window is ideal. You want it to see a lot of the sky without letting harsh, direct midday rays hit the foliage, which will cause severe, irreversible sunburn (large white or crispy brown patches). Gentle morning sun from an east-facing window is also fantastic.
Soil
Because Monsteras have thick, fleshy roots that need to breathe, standard, heavy potting soil will suffocate them and lead to root rot. The best soil mix for monstera deliciosa in pots is a custom, chunky “aroid mix.”
Create a light, aerated blend by mixing:
- 40% high-quality indoor potting soil (preferably peat or coco coir based)
- 30% coarse orchid bark
- 20% perlite or pumice
- 10% horticultural charcoal and worm castings
This coarse mixture ensures water rushes through the pot, leaving behind perfectly damp pockets of soil and plenty of oxygen.
Water
Monsteras prefer their soil to be slightly moist but never waterlogged. Wait until the top two to three inches of your soil mix feel completely dry before watering. Stick your finger into the pot; if it feels cool and damp, wait a few more days. When it is time to water, soak the plant thoroughly until water pours out of the bottom drainage holes, then discard any excess water from the saucer. During the active growing season (spring and summer), you may need to water every 1 to 2 weeks. In the winter, cut back significantly.
Temperature and Humidity
As tropical natives, Monsteras despise the cold. Keep your indoor temperatures comfortable, ideally between 65°F and 85°F. Anything below 55°F will severely stunt its growth, and freezing temperatures will kill it.
While they can adapt to standard household humidity (around 40%), they will grow much larger, glossier leaves if you can provide humidity levels of 60% or higher. Grouping plants together or utilizing a dedicated room humidifier is the best way to achieve this.
Fertilizer
To support the development of three-foot-wide leaves, your plant needs fuel. Feed your Monstera with a balanced, liquid houseplant fertilizer (a 20-20-20 blend is great) diluted to half strength once a month from early spring through late summer. Pause fertilizing entirely during the winter dormancy period to prevent salt buildup in the soil.
Types of Monstera
While Monstera deliciosa is the staple, there are a few variations and highly sought-after cultivars you might encounter:
- Monstera deliciosa (Large Form): The classic, sprawling giant with deep splits and secondary holes (inner fenestrations) along the midrib.
- Monstera deliciosa var. borsigiana: Often sold simply as Monstera Deliciosa, this is a slightly smaller, faster-growing, more aggressively vining form. Its leaves don’t grow quite as massive, and it rarely develops secondary inner holes.
- Monstera Thai Constellation: A wildly popular, lab-created cultivar featuring stable, gorgeous creamy-yellow speckles and splashes that look like a galaxy of stars.
- Monstera Albo Borsigiana: The crown jewel of rare houseplants. It features breathtaking, stark white variegation, sometimes producing entirely half-white (half-moon) leaves.
Pruning
Monsteras are aggressive growers and can quickly take over a room if left unchecked. Pruning is essential for managing their footprint.
- When to prune: Spring is the best time, as the plant is actively pushing out new growth and will recover quickly.
- How to prune: Use sharp, sterilized pruning shears. If you want to control height or width, cut the stem just above a leaf node.
- Maintenance: Always prune off dead, fully yellowed, or severely damaged leaves at the base of the stem. This redirects the plant’s energy into healthy foliage.
Propagating
Monsteras are incredibly easy to multiply, making them great plants to share with friends. If you want to learn how to propagate monstera deliciosa with aerial roots, follow these steps:
- Identify the Node: You cannot propagate a Monstera from a single leaf; you must have a piece of the stem that includes a node (the thick, bumpy joint where leaves and aerial roots emerge).
- Make the Cut: Find a healthy section of the vine with at least one leaf, a node, and ideally an aerial root. Make a clean cut an inch below the node.
- Water Propagation: Place the cutting into a heavy glass vase filled with room-temperature water. Submerge the node and aerial root, but keep the leaf stem out of the water.
- Wait: Place it in bright, indirect light. The aerial root will soon sprout fine, white water roots. Change the water weekly.
- Planting: Once the new root system is a few inches long and well-branched (usually 4 to 6 weeks), pot it up in your chunky aroid mix.
Potting & Repotting
Monsteras grow fast and have aggressive, thick root systems. You will likely need to repot a young Monstera once a year, and a mature one every two to three years.
- Knowing When to Repot
Look for roots escaping the bottom drainage holes, roots violently circling the top of the soil, or water draining instantly without soaking into the dirt.
How to Repot a Large Monstera with a Moss Pole
Because they are climbers, a Monstera will eventually flop over and sprawl awkwardly across your floor unless given support. Repotting is the perfect time to add a moss pole.
- Choose a heavy pot with drainage holes that is only 2 to 3 inches wider than the current pot.
- Add a layer of chunky soil to the bottom.
- Insert the Moss Pole First: Place a sturdy sphagnum moss pole or coco coir totem at the back of the pot. Doing this before you add the plant prevents you from stabbing and destroying the root system later.
- Place the Monstera in front of the pole, ensuring the back of the stem (where the aerial roots grow) is facing the pole.
- Backfill with soil, pressing down gently to secure the pole and the plant.
- Use soft plant velcro or twine to tie the main stem (not the leaf petioles) to the pole. Over time, the aerial roots will naturally grip the moist pole and climb upward!
Common Pests and Diseases
Even the mighty Monstera can succumb to indoor pests and fungal issues if the environment is compromised.
- Thrips: The absolute arch-nemesis of the Monstera. These tiny, slender insects suck the sap from new growth, causing the leaves to look dull, scarred, and eventually turn a rusty, patchy brown. If you see tiny black dots (their droppings) and silvery streaks on the leaves, act immediately with a systemic insecticide and insecticidal soap.
- Spider Mites: Look for microscopic webbing near the stems and tiny yellow stippling on the leaves. Wipe down the massive leaves with a damp cloth and apply neem oil.
- Fungus Gnats: Tiny black flies buzzing near the soil surface. They breed in constantly wet soil. Let the top inches of your potting mix dry out thoroughly to break their life cycle.
- Root Rot: A fungal disease caused by dense, soggy soil. The plant will droop despite being wet, and leaves will turn a sickly yellow with mushy brown spots. You must repot into fresh, dry, chunky soil and trim away the black, rotting roots.
Common Issues
Why Are My Monstera Leaves Turning Yellow and Brown?
This is a classic sign of moisture stress.
- Overwatering: If the yellowing starts at the bottom of the plant and the leaves have dark, mushy brown spots with a yellow halo, the soil is staying far too wet.
- Underwatering: If the leaves look slightly yellow and faded overall, and the edges are dry, crispy, and brown, the plant is severely dehydrated.
- Natural Aging: If only one very old leaf at the very bottom of the plant turns a solid, bright yellow and drops off while the rest of the plant is pushing out huge new leaves, this is completely normal senescence (aging).
My Plant Isn’t Getting Any Splits (Fenestrations)
Patience is key! Juvenile Monsteras naturally produce solid, heart-shaped leaves for the first year or two of their life. If you have an older plant that suddenly stops producing split leaves, it is begging for more sunlight. Move it closer to a window. Providing a moss pole for it to climb also hormonally triggers the plant to mature and produce larger, fenestrated foliage.
Drooping Leaves
If your plant looks sad and wilted, check the soil. If it is bone dry, a thorough watering will perk it right up. If the soil is soaking wet and it’s still drooping, you are likely dealing with root rot.
The best thing about FNF Fire In The Hole is how quickly you can start playing. Good page for testing a new FNF mod.
My spouse and I stumbled over here coming from a different web address and thought I
should check things out. I like what I see so i am just following you.
Look forward to looking at your web page yet again.