- The Classic Beauty: How to Grow and Care for a Boston Fern
- Boston Fern Profile Quick Look
- Essential Boston Fern Care
- Light Requirements
- Soil Needs
- Water: The Golden Rule
- Temperature and Humidity
- Fertilizer
- Types of Boston Ferns
- Pruning and Maintenance
- Growing in Pots and Hanging Baskets
- Propagating Your Boston Fern
- Growing From Spores (For the Adventurous Gardener)
- Overwintering
- Common Pests and Diseases
- Common Issues (Troubleshooting)
- Why is My Indoor Boston Fern Shedding Leaves?
- Yellowing Fronds
- Crispy Brown Frond Tips
- FAQ
The Classic Beauty: How to Grow and Care for a Boston Fern
Welcome back to Plant It! If you want to infuse your home, porch, or patio with a touch of classic, lush elegance, nothing quite compares to the cascading, feathery fronds of the Boston Fern (Nephrolepis exaltata).
A staple of Victorian parlors and modern southern porches alike, this stunning tropical plant is famous for its vibrant green, arching swords that look spectacular spilling out of a hanging basket or perched atop a tall plant stand. However, despite their widespread popularity, Boston Ferns have a notorious reputation for being a bit dramatic. If you have ever brought one indoors for the winter only to end up sweeping up hundreds of crispy, shedding leaflets every single day, you know exactly what we mean!
But do not let that intimidate you. Cultivating a thriving, massive Boston Fern is entirely possible once you understand that their care revolves around one non-negotiable factor: moisture. In this comprehensive, pillar-style guide, we will walk you through exactly how to care for your fern, how to overwinter it successfully without losing your mind, and how to multiply your collection.
Boston Fern Profile Quick Look
| Feature | Details |
| Common Name | Boston Fern, Sword Fern |
| Botanical Name | Nephrolepis exaltata |
| Plant Type | Evergreen tropical fern |
| Mature Size | 2 to 3 feet tall and wide |
| Sun Exposure | Bright, indirect light to partial shade |
| Soil Type | Rich, loamy, highly moisture-retentive but well-draining |
| Soil pH | Slightly acidic (5.0 to 5.5) |
| Toxicity | Non-toxic and completely pet-safe |
| Native Area | Tropical regions of the Americas, Africa, and Polynesia |

Essential Boston Fern Care
To keep your fern looking like a lush, green waterfall rather than a crispy tumbleweed, you must strive to replicate its native tropical swamp environment. Consistency is key!
Light Requirements
In their natural habitat, Boston Ferns grow on the forest floor or perched on tree branches beneath a dense canopy of leaves. They are accustomed to dappled, filtered sunlight.
Indoors, place your fern near a bright east-facing or north-facing window. If you place it in a south- or west-facing window, you must filter the light with a sheer curtain. Never expose a Boston Fern to harsh, direct midday sun. The delicate fronds will quickly scorch, turning a bleached gray or crispy brown.
Soil Needs
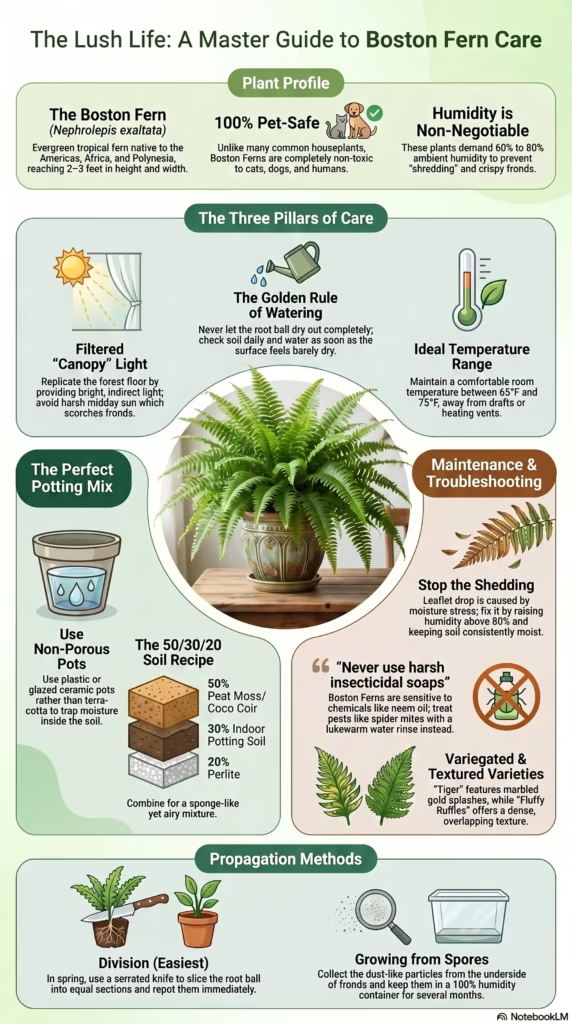
Unlike succulents or aroids that love chunky, fast-draining bark, the best potting soil mix for boston ferns in hanging baskets is one that acts like a sponge while still allowing excess water to escape.
You want a heavily peat-based mixture. A perfect homemade recipe is:
- 50% high-quality peat moss or coco coir (for moisture retention)
- 30% standard indoor potting soil
- 20% perlite (to ensure the roots still get oxygen and don’t rot)
Water: The Golden Rule
The fastest way to kill a Boston Fern or force it into a shedding frenzy is to let the root ball dry out completely. The soil must remain consistently, evenly moist at all times. Check the soil every single day. As soon as the surface feels barely dry to the touch, it is time to water. When watering, soak the soil thoroughly until water drains from the bottom. However, “moist” does not mean “muddy.” Do not let the pot sit in a saucer of standing water, or root rot will inevitably set in.
Temperature and Humidity
Boston Ferns prefer comfortable room temperatures between 65°F and 75°F. They despise extreme heat and extreme cold. Keep them far away from drafty windows, exterior doors, radiators, and blasting air conditioning vents.
Humidity is the true secret to success. These plants demand high ambient humidity (ideally 60% to 80%). Typical indoor heating systems drop winter humidity to around 20%, which is a death sentence for a fern. To raise humidity, run a continuous room humidifier, place the pot on a large pebble tray filled with water, or keep the fern in a naturally humid room like a bright bathroom.
Fertilizer
Ferns are not heavy feeders. Apply a water-soluble, balanced houseplant fertilizer diluted to half-strength once a month from early spring through early fall. Over-fertilizing can easily burn their sensitive root systems, leading to crispy brown tips on the fronds. Pause all feeding during the winter months.
Types of Boston Ferns
While the standard Nephrolepis exaltata is the most common, breeders have developed several gorgeous, textured cultivars:
- ‘Fluffy Ruffles’: A compact, highly textured variety where the individual leaflets are deeply ruffled and overlapping, giving it a dense, feathery appearance.
- ‘Dallas’ (Dallas Fern): Developed specifically to tolerate lower light and slightly drier air than a standard Boston Fern, making it an excellent choice for typical indoor environments.
- ‘Tiger’ (Tiger Fern): A highly sought-after, variegated variety featuring stunning, marbled splashes of golden yellow and bright green along the fronds.
- ‘Compacta’: A miniature version of the classic Boston Fern that stays short and bushy, perfect for tabletop displays.
Pruning and Maintenance
Boston ferns respond beautifully to pruning. As the plant grows, older fronds at the base will naturally dry up, turn brown, and die. This is normal!
Use sharp, sterilized scissors to cut these dead fronds away completely at the soil line to keep the plant looking tidy and to allow air to circulate through the crown. If your fern has suffered severe drought and looks mostly dead, do not throw it away! You can cut the entire plant down to about two inches above the soil line. Keep it moist and warm, and it will often push out a completely fresh, new flush of green growth.
Growing in Pots and Hanging Baskets
- Choosing the Right Pot: Unlike cacti, which love breathable terra-cotta, Boston Ferns do best in plastic or glazed ceramic pots. These non-porous materials trap moisture inside the soil, preventing the root ball from drying out too quickly between waterings.
- Repotting: Boston Ferns are vigorous growers and will quickly fill a pot with their dense, wiry root system. Plan to repot every spring into a container that is only 2 inches wider than the current one. If the water runs straight down the sides of the pot without soaking in, your fern is severely root-bound and needs repotting immediately.
Propagating Your Boston Fern
You cannot propagate a fern from a stem or leaf cutting. If you want to share your plant, learning how to propagate boston fern by division is the easiest and most successful route.
- Timing: The best time to divide is in early spring when you are already planning to repot the plant.
- Unpot: Remove the fern from its container. The root ball will likely look like a dense, solid mat of fuzzy, wiry roots.
- Cut the Root Ball: Do not try to gently pull it apart; you will just damage the plant. Take a large, serrated, sterilized knife and literally slice straight down through the center of the root ball, cutting the plant into two or four equal sections. Ensure each section has healthy roots and plenty of green fronds.
- Repot: Plant each new section into its own pot filled with fresh, moist potting mix. Keep them out of direct sunlight and highly humid for a few weeks while they recover from the shock.
Growing From Spores (For the Adventurous Gardener)
Ferns do not produce flowers or seeds. Instead, they reproduce via tiny dust-like particles called spores. If you look at the underside of mature fern leaves, you might see rows of perfectly organized brown or black dots—these are not bugs, they are spore cases (sori)!
Growing from spores is a fascinating but painfully slow process:
- Cut off a frond with dark, plump spore cases and lay it spore-side down on a piece of white paper. Leave it for a few days until the fine, dusty spores drop onto the paper.
- Fill a shallow, sterile plastic container with damp, sterile peat moss.
- Sprinkle the spore dust evenly over the surface. Do not cover them with dirt.
- Cover the container tightly with clear plastic wrap to create a 100% humidity greenhouse and place it in a warm, low-light spot.
- In a few months, a green, mossy slime will form on the soil. Eventually, tiny, miniature fern fronds will emerge from this moss.
Overwintering
If you kept your fern outside on a porch during the summer, figuring out how to overwinter a boston fern indoors is crucial to its survival.
Before the first frost, bring the fern inside. Be prepared: the sudden change in light, temperature, and humidity will cause the plant to shock and shed a massive amount of leaves. This is inevitable.
- Place it in your brightest (but indirect) window.
- Drastically increase the humidity around it.
- Reduce watering slightly. Because the plant’s growth slows down in winter, it will not drink water as fast as it did in the summer heat. Wait until the top inch of soil is dry before watering.
Common Pests and Diseases
Ferns are generally highly resistant to pests, but stressed indoor plants can attract a few invaders:
- Spider Mites: These microscopic pests love dry indoor winter air. They spin fine webs on the fronds and suck the sap, turning the leaves pale and dusty. Treat by carrying the fern to the shower and rinsing the foliage thoroughly with lukewarm water.
- Mealybugs: Look for sticky, white cotton-like masses hiding deep in the crown of the plant. Treat by dabbing them with a Q-tip soaked in rubbing alcohol. Warning: Never use harsh insecticidal soaps or neem oil on a Boston Fern; the chemicals will heavily burn their sensitive fronds!
- Root Rot: A fungal disease caused by letting the pot sit in standing water. The fronds will turn a sickly yellow/gray and droop, and the soil will smell like a swamp.
Common Issues (Troubleshooting)
Why is My Indoor Boston Fern Shedding Leaves?
If you are sweeping up crispy leaflets every day, your fern is suffering from moisture stress.
- The air is too dry (humidity is below 50%).
- You are letting the soil dry out completely between waterings.
- The plant is situated next to a heating vent or drafty window.
Fix the environment, and the shedding will stop.
Yellowing Fronds
If the lower, older fronds are turning a solid, pale yellow, it is typically a sign of overwatering and suffocating roots. If the entire plant is turning pale, washed-out green or yellow, it is likely starving for nutrients and needs a dose of diluted fertilizer.
Crispy Brown Frond Tips
Brown tips are a classic symptom of low humidity, underwatering, or a buildup of salts from hard tap water or excess fertilizer. Flush the soil thoroughly with distilled water and increase the ambient humidity in the room.