Let’s talk about the summer struggle.
You know exactly what I’m talking about. You spend a small fortune on beautiful plants in May. You water them religiously. By late July, your yard looks like the surface of Mars, and your water bill is funding your city’s new municipal pool.
It’s exhausting. And frankly, it doesn’t make a lot of sense anymore.
With water restrictions becoming the norm and summers getting hotter, the traditional green lawn and thirsty perennial borders are officially on their way out. What’s stepping in to save the day (and your sanity)?
Enter gravel gardening.
This isn’t just dumping a pile of rocks in your front yard. It’s a sophisticated, beautiful, and incredibly smart way to landscape. If you want a yard that looks like a high-end Mediterranean villa but drinks like a camel, you’re in the right place.
Let’s dive into exactly how to pull off a stunning low-water garden design in 2026.
Gravel Garden vs. Xeriscape: What’s the Difference?
If you’ve been researching water-wise landscaping, you’ve probably seen these two terms thrown around interchangeably. But they aren’t exactly the same thing. Let’s clear up the confusion.
- Xeriscape: This is a broad philosophy or set of principles. It simply means landscaping in a way that reduces or eliminates the need for supplemental irrigation. A xeriscape can use mulch, bark, rocks, or even just densely planted drought-tolerant shrubs. It’s the idea.
- Gravel Garden: This is a specific style or execution of xeriscaping. It uses gravel as the primary ground cover and growing medium. The plants are planted directly into the gravel and underlying soil.
Think of it this way: All gravel gardens are xeriscapes, but not all xeriscapes are gravel gardens.
Gravel gardens give you a very specific aesthetic—think the stunning, flowing gardens of Beth Chatto in the UK or the sun-baked hillsides of the Mediterranean. It’s a look that is wildly popular right now because it pairs beautifully with modern architecture, but it works just as well with a rustic cottage.
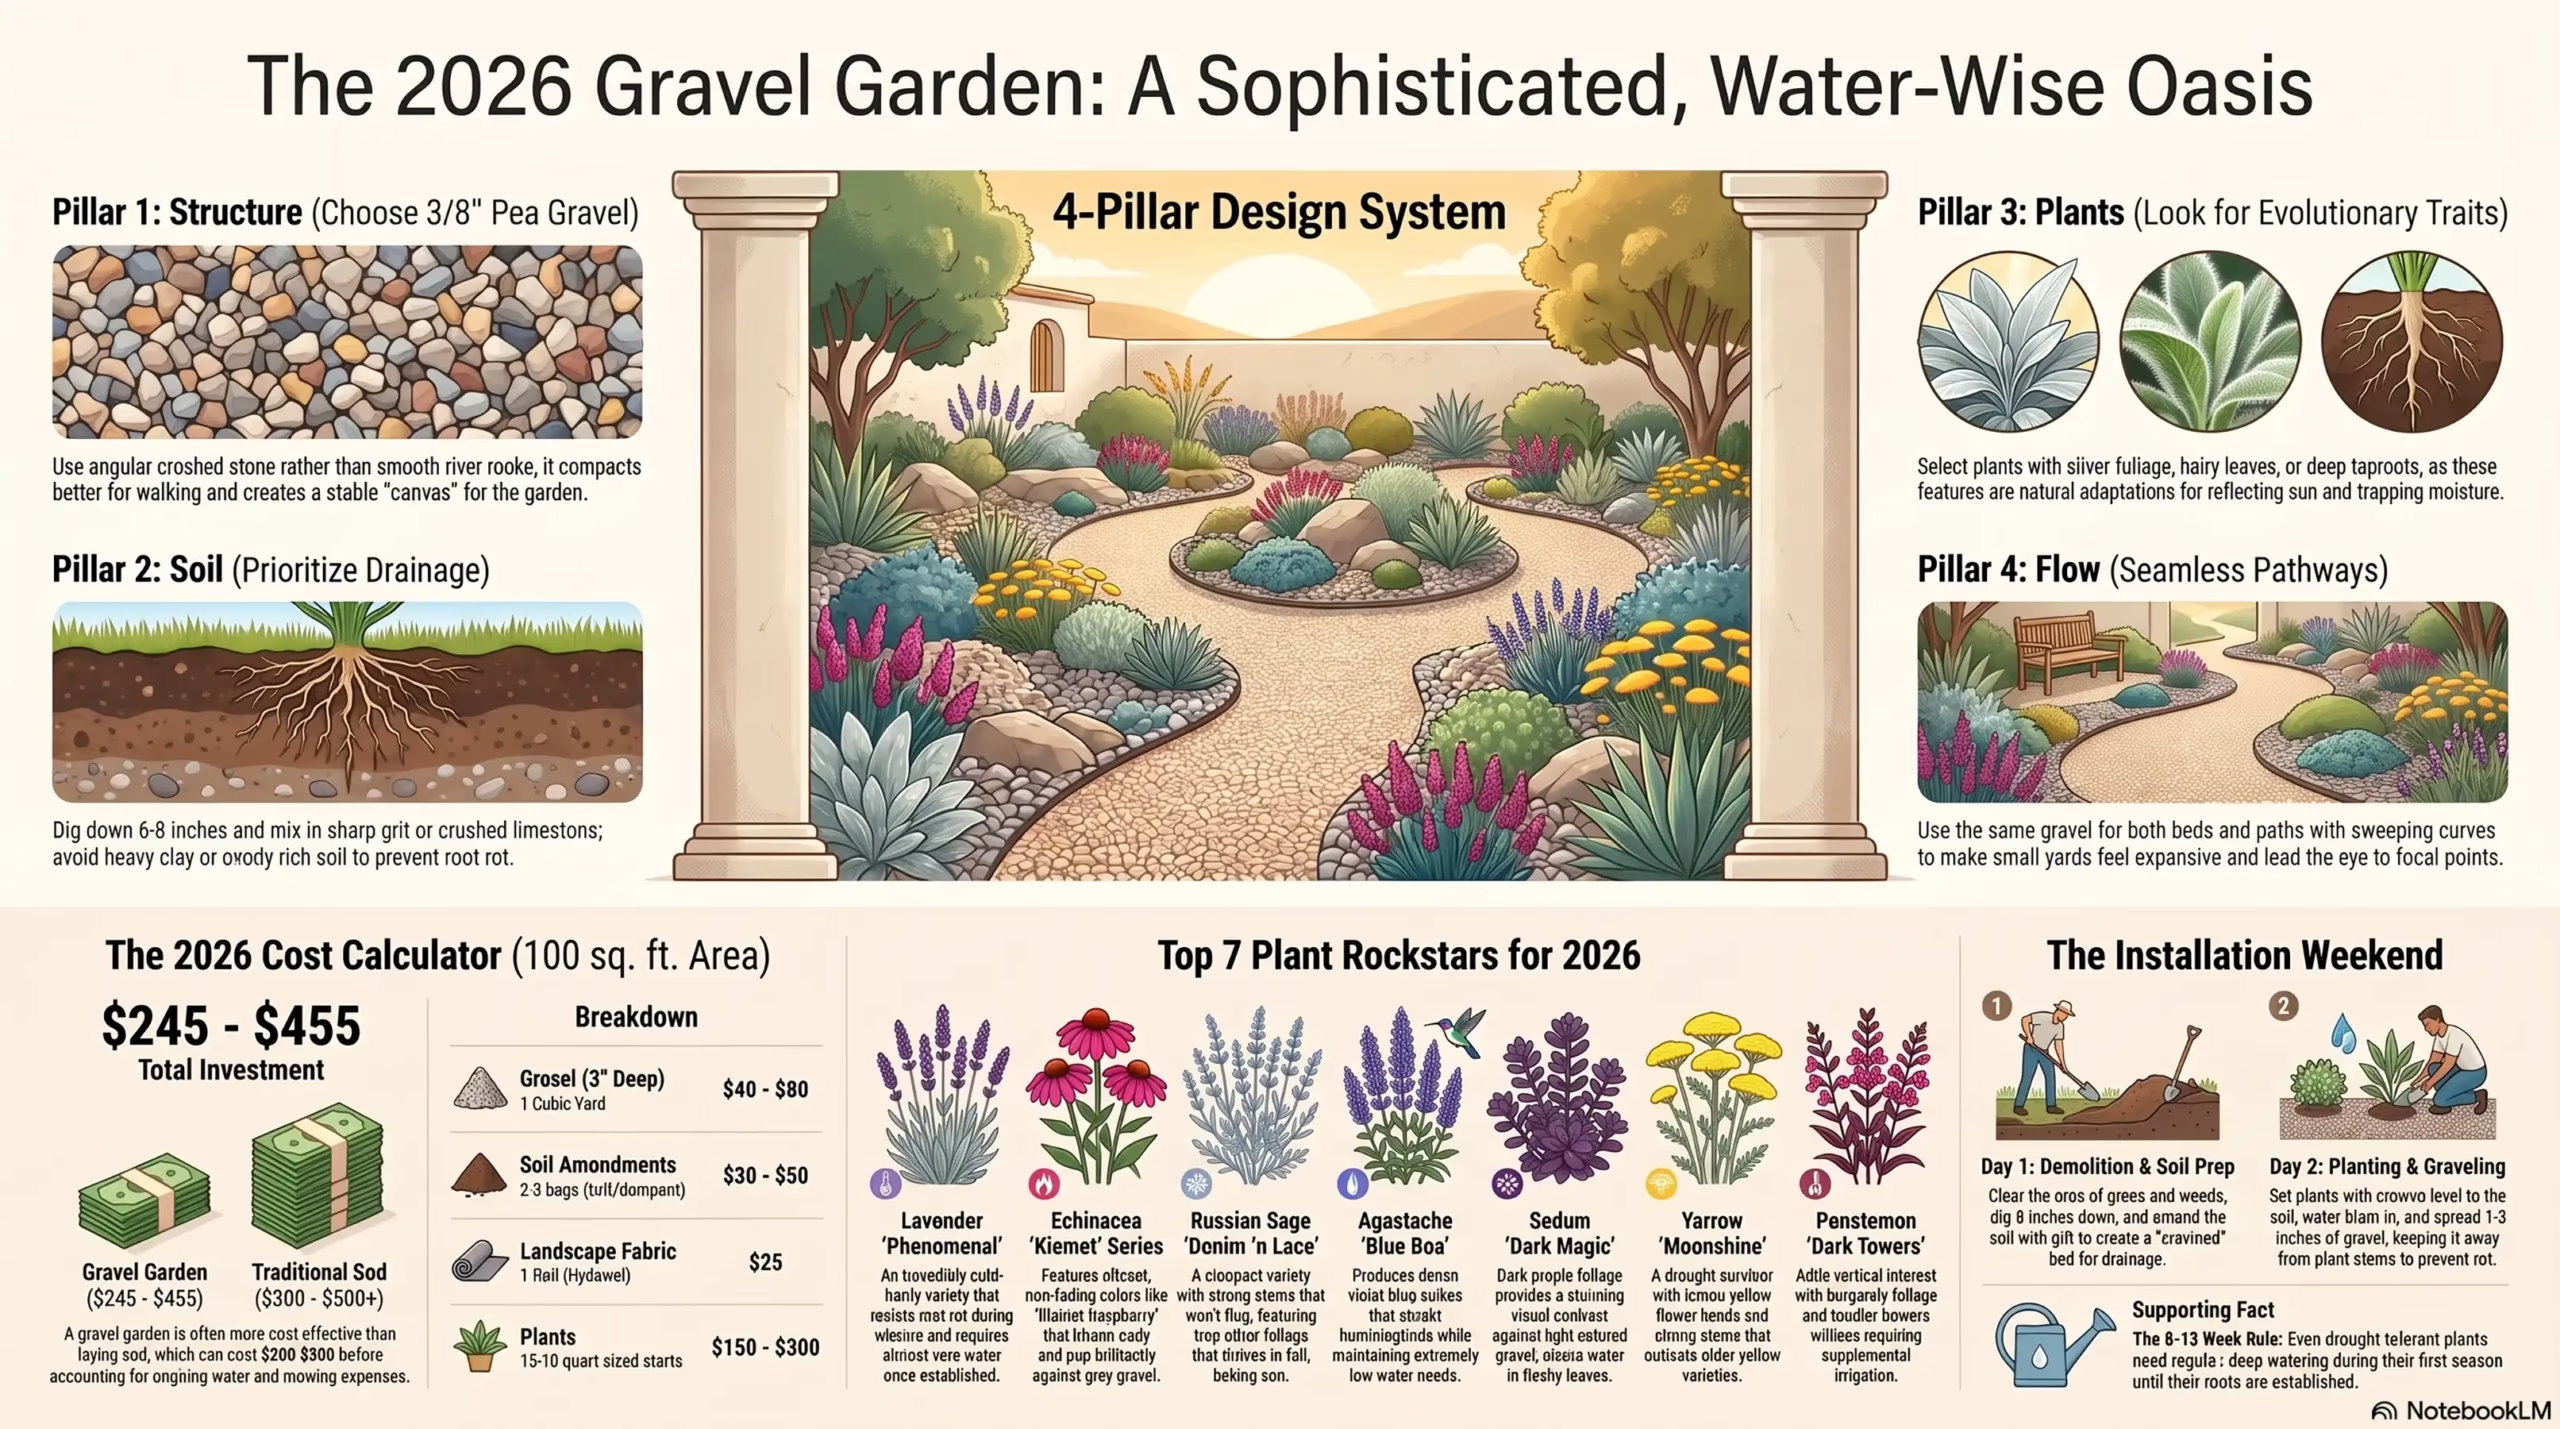
The 4-Pillar Design System
A successful gravel garden isn’t just plants thrown on top of rocks. If you do that, it looks like a parking lot. To get that lush, designer look, you need my 4-Pillar System.
Pillar 1: Structure (Choosing Your Gravel)
The gravel you choose is the background canvas of your garden. Get this wrong, and the whole thing feels off.
- Size matters: You want crushed stone, not river rocks. Pea gravel (about 3/8 inch) is the gold standard. It’s easy to walk on and compacts nicely.
- Color palette: Stick to local stone. If you live in a desert, use warm golds and reds. If you live in a coastal area, use cool greys and whites.
- What to avoid: Never use white marble chips (they reflect too much heat and burn plants) or large, smooth river stones (they look unnatural and are impossible to walk on).
Pillar 2: Soil (The Drainage Factor)
Plants that live in gravel hate having wet feet. If you have heavy clay soil, you cannot just plop gravel on top. The water will pool, and the roots will rot.
You need to amend the soil before the gravel goes down.
- Dig down 6 to 8 inches.
- Mix in generous amounts of sharp grit or crushed limestone (not smooth sand, which acts like concrete).
- Add a little bit of compost, but go easy. You want poor, well-draining soil. If the soil is too rich, the plants will grow too fast and flop over.
Pillar 3: Plants (The Selection Criteria)
When choosing xeriscape plants, look for specific adaptations:
- Silver or grey foliage (reflects the sun).
- Hairy or fuzzy leaves (trap moisture).
- Narrow leaves (reduce surface area for water loss).
- Deep taproots (hunt for water deep underground).
Pillar 4: Flow (Pathway Design)
A great gravel garden is meant to be explored. Use the same gravel for your planting beds and your pathways to create a seamless, expansive feel.
Curve the paths. Don’t make them straight. A gently sweeping path makes a small yard feel massive and draws the eye to a focal point—like a large boulder, a piece of garden art, or a striking specimen plant.
The 2026 Gravel Garden Cost Calculator
Want to know what this will set you back? Here’s a rough estimate for a standard 10×10 foot (100 sq. ft.) area:
- Gravel (3 inches deep): You’ll need about 1 cubic yard. Cost: $40 – $80
- Soil Amendments (Grit/Compost): 2-3 bags. Cost: $30 – $50
- Landscape Fabric (Optional, see troubleshooting): 1 roll. Cost: $25
- Plants (1 per sq. ft. to start): About 15-20 quart-sized plants. Cost: $150 – $300
- Total Estimated Cost: $245 – $455
(Compare that to laying sod, which costs $300-$500 just for the grass, before water and maintenance!)
Plant Performance Profiles
Don’t just go to the nursery and buy anything with a “drought tolerant” tag. You need plants that actually thrive in the harsh, dry, reflected heat of a gravel bed.
Here are 7 absolute rockstars for gravel gardening, including some stellar 2026 varieties.
1. Lavender (Lavandula angustifolia)
- The Stats: 18-24 inches tall. Full sun.
- Water Needs: Almost zero once established.
- 2026 Variety to Look For: Lavandula ‘Phenomenal’. This variety is incredibly cold-hardy and resists the root rot that usually kills lavender in wet winters.
- Companion Planting: Pair with Rosemary or Ornamental Sage. They share the same Mediterranean vibe and soil needs.
2. Echinacea (Echinacea purpurea)
- The Stats: 24-36 inches tall. Full sun.
- Water Needs: Low. Deep taproots find their own water.
- 2026 Variety to Look For: The Kismet series (like ‘Kismet Raspberry’). They bloom earlier, flower longer, and have incredibly vibrant, non-fading colors that pop brilliantly against grey gravel.
- Companion Planting: Plant behind lower-growing ornamental grasses so the cones hover above the foliage.
3. Russian Sage (Perovskia atriplicifolia)
- The Stats: 3-4 feet tall. Full, baking sun.
- Water Needs: Very low. Hates wet soil.
- 2026 Variety to Look For: Perovskia ‘Denim ‘n Lace’. Older varieties get floppy and woody. This new variety stays compact, has strong stems that don’t need staking, and features lacy, silver foliage.
- Companion Planting: Stunning when planted in massive drifts alongside Black-eyed Susans.
4. Agastache (Agastache spp.)
- The Stats: 18-36 inches tall. Full sun.
- Water Needs: Extremely low.
- 2026 Variety to Look For: Agastache ‘Blue Boa’. It produces massive, dense spikes of deep violet-blue flowers that hummingbirds lose their minds over.
- Companion Planting: Mix with Yarrow for a wildflower-meets-gravel-garden look.
5. Sedum (Sedum spectabile)
- The Stats: 12-24 inches tall. Full sun to part shade.
- Water Needs: Low. Stores water in its fleshy leaves.
- 2026 Variety to Look For: Sedum ‘Dark Magic’. Deep purple, almost black foliage with dusty pink flowers. The dark leaves contrast beautifully with light-colored gravel.
- Companion Planting: Great for the front edge of the garden, paired with low-growing thyme.
6. Yarrow (Achillea millefolium)
- The Stats: 18-24 inches tall. Full sun.
- Water Needs: Negligible. Will survive pure drought.
- 2026 Variety to Look For: Achillea ‘Moonshine’. It holds its bright, lemon-yellow color better than older yellow yarrows and has stronger stems.
- Companion Planting: The flat flower heads of Yarrow contrast perfectly with the spiky flowers of Agastache or Lavender.
7. Penstemon (Penstemon digitalis)
- The Stats: 24-36 inches tall. Full sun.
- Water Needs: Very low.
- 2026 Variety to Look For: Penstemon ‘Dark Towers’. Features deep burgundy foliage and pink-white tubular flowers. It brings vertical interest to the garden without requiring extra water.
- Companion Planting: Plant in groups of 3 or 5 to create a bold, vertical exclamation point in the landscape.
Installation Weekend Project
Ready to build this? You can completely transform a 10×10 foot space in a single weekend.
Your Tool List
- Flat-edged shovel
- Steel garden rake
- Wheelbarrow
- Heavy-duty landscape staples
- Tamper tool (for compacting gravel)
- Trowel for planting
Day 1: Demolition & Dirt Work
Morning: Clear the Canvas
- Remove all existing grass, weeds, and old mulch.
- Pro Tip: If the area is covered in weeds, do NOT use weed killer. Lay down a thin layer of cardboard right on top of the grass/weeds, water it heavily, and start digging your beds right through the wet cardboard. It will smother the weeds beneath.
Afternoon: Amend and Grade
- Dig down about 6 inches.
- Mix in your sharp grit and a small amount of compost.
- Use your rake to slightly crown the center of your bed. You want a very subtle dome shape so water drains away from the center of the plants, not toward their roots.
- Tamp the soil down lightly with your feet or a tamper. You don’t want it packed like concrete, but it needs to be firm.
Day 2: Fabric, Plants, & Gravel
Morning: The Barrier (Proceed with Caution)
- If you have an aggressive weed problem (like Bermuda grass), lay down professional-grade, permeable landscape fabric. Pin it down tightly with staples.
- Crucial Note: If you don’t have a severe weed issue, skip the fabric. Many experts now argue that fabric prevents the organic matter from naturally breaking down into the soil. If you skip it, just make sure the soil is totally weed-free before planting.
Afternoon: Plant and Cover
- Cut X’s in the fabric (if using). Dig your holes.
- Plant your starts. Important: Plant them so the crown of the plant (where the stem meets the roots) is exactly level with the soil surface. Do not bury them deep!
- Water the plants in well with a slow trickle to settle the soil.
- Now, bring in the gravel. Spread it evenly, 2 to 3 inches deep.
- Use the back of your rake to gently smooth the gravel.
- Warning: Do NOT pile gravel up against the stems of the plants. Keep the gravel a few inches away from the crown so the plant can breathe and doesn’t rot.
Troubleshooting Common Issues
Even the best gardens have hiccups. Here is how to handle the three most common complaints about gravel garden maintenance.
Issue 1: “Weeds are growing in my gravel!”
Let’s be real. Weeds have a sick sense of humor, and yes, some will blow in.
But here is the secret: weeds in gravel are incredibly easy to deal with. Because they are rooted in loose stone rather than compacted earth, they pull out with zero resistance.
- The Fix: Spend 10 minutes every two weeks walking through with a hoe. Just slice the top off the weeds at the soil line. They will die instantly because they have no soil reserve to draw from. Do not let them go to seed!
Issue 2: “My plants collapsed and died in the middle of summer.”
This is almost always a root rot issue, not a drought issue. People think, “It’s a drought plant, I’ll never water it!”
- The Fix: Understand the “Establishment Period.” For the first 8 to 12 weeks after planting, your drought-tolerant plants need regular, deep watering. Their roots are still tiny and haven’t tapped into the deep groundwater yet. After that first summer, you can basically turn the hose off forever.
If a plant collapses suddenly, dig it up. If the roots are brown and mushy, your soil wasn’t draining fast enough. Next time, add more grit to that specific hole before replanting.
Issue 3: “The gravel is messy and kicks onto my patio.”
This happens when you buy the wrong size gravel or don’t compact it.
- The Fix: Avoid pea gravel that is perfectly round and smooth; it rolls like marbles. Use angular, crushed stone (like decomposed granite or crushed limestone). The jagged edges lock together when you tamp it down. Once it settles after a few rainstorms, it will solidify into a firm, walkable surface that rarely kicks out of place.
The Bottom Line
Drought-tolerant landscaping isn’t a compromise. It’s an upgrade.
By embracing gravel gardening, you are stepping off the treadmill of constant watering, fertilizing, and mowing. You are creating a space that actually likes the heat, rather than fighting it tooth and nail.
Grab your shovel, order some crushed gravel, and start imagining your own little slice of the Mediterranean, right outside your front door.