Table of Contents
Let’s be honest for a second.
That perfectly manicured, bright green, weed-free lawn we’ve all been taught to covet? It’s basically an ecological desert.
It takes tons of water, requires chemicals that harm our pets and kids, and offers absolutely nothing to the birds, bees, and butterflies that are literally trying to survive right outside our doors.
If you’ve felt a pull to do things differently, you aren’t alone. Welcome to the Rewilding Garden 2026 movement.
This isn’t about letting your yard turn into an unruly, scary jungle that will make your neighbors call the HOA. It’s about intentionally stepping back so nature can step forward. It’s about replacing sterile grass with beautiful, buzzing life.
If you’re ready to trade your mower for a pair of pruning shears and a cup of tea while you watch the butterflies, you’re in the right place. Here is your realistic, no-nonsense, step-by-step guide to rewilding your space.
The 2026 Shift: Why Rewilding Right Now?
You might be wondering, why is everyone talking about rewilding specifically now?
It comes down to a perfect storm of urgent data and changing rules.
We’ve lost a staggering amount of our pollinator populations over the last few decades. Monarch butterflies are at historic lows. Several species of native bumblebees are teetering on the edge of extinction. When pollinators die, our food supply suffers. It’s that simple.
But here is the good news: your yard can be part of the solution.
In 2026, we are seeing a massive shift in how local governments view our yards. Because of the climate crisis and severe droughts, many municipalities are actually banning or restricting non-functional turf grass.
Some cities are even offering rebates if you rip out your lawn and replace it with native plants for pollinators.
The tides are turning. The manicured lawn is out, and the living landscape is in. And honestly? The living landscape is a lot more fun to look at.
The 3-Step Rewilding Framework
Most “how to create a wildflower meadow” guides tell you to throw some seeds in the dirt and walk away. That is a recipe for a weed-filled disaster.
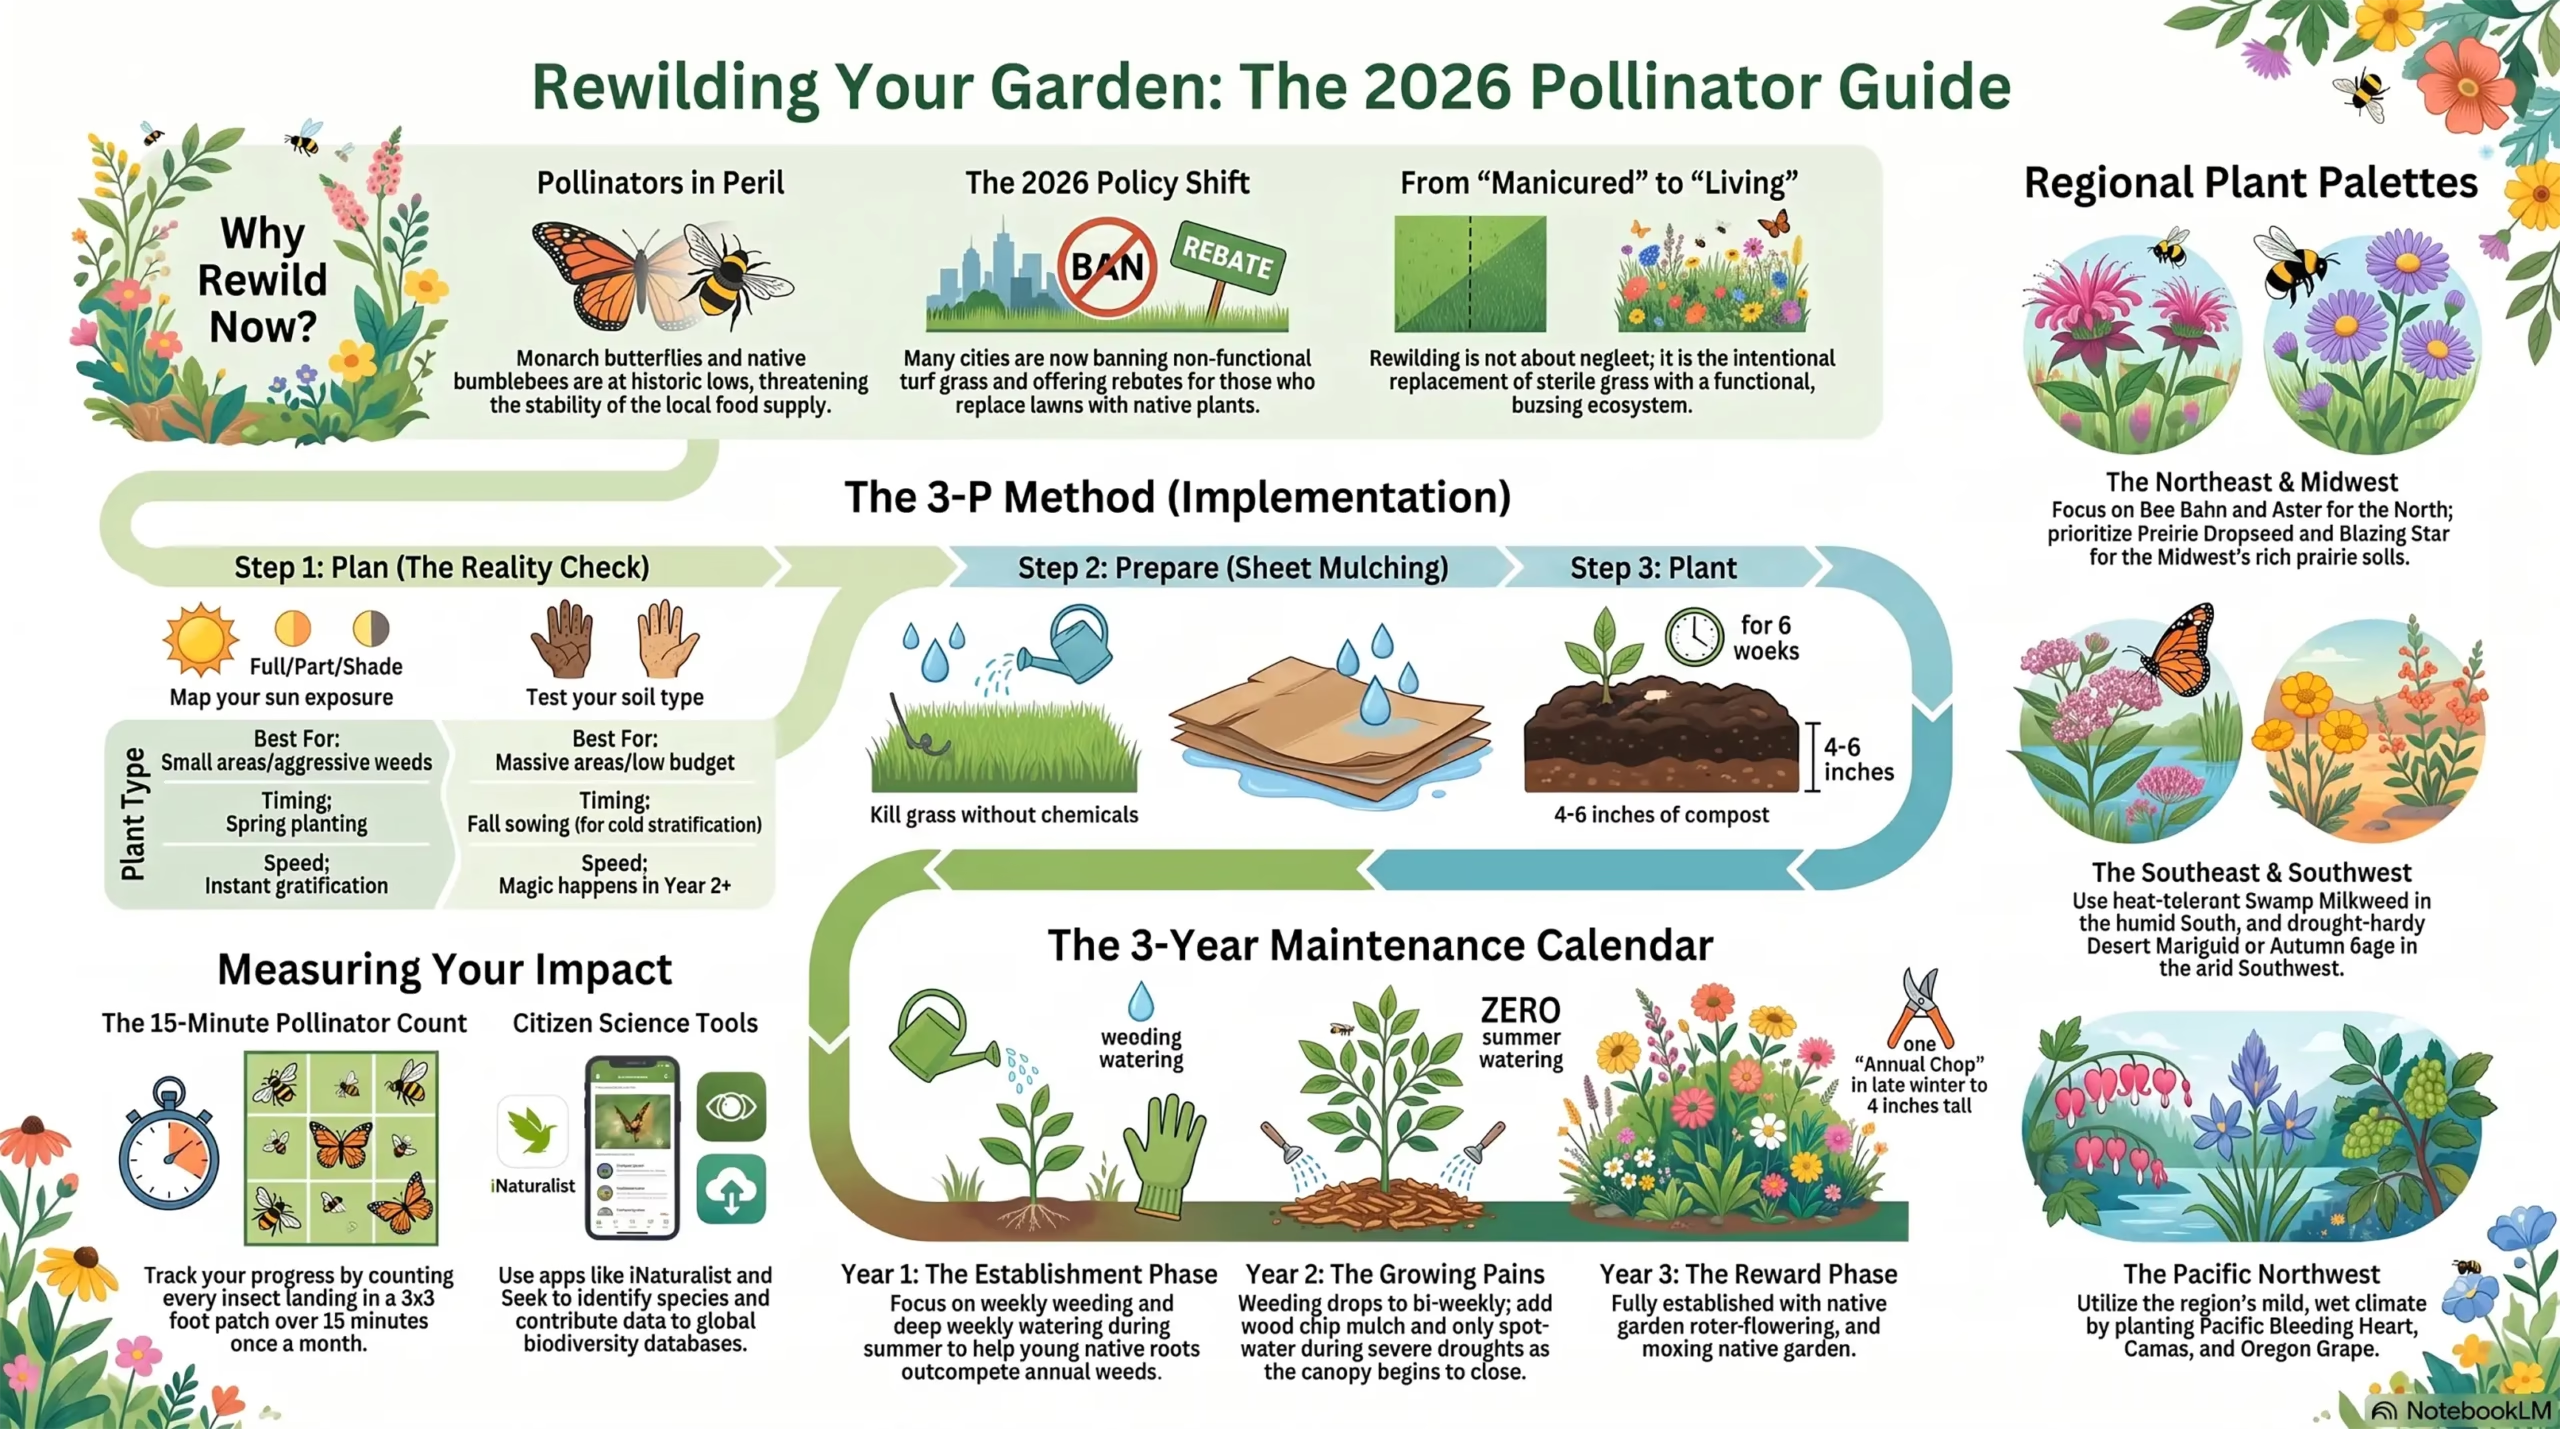
To do this right, you need a framework. I call it the 3-P Method: Plan, Prepare, Plant.
Step 1: Plan (The Reality Check)
Before you buy a single seed, you need to look at your yard with honest eyes.
- How much sun do you get? Watch your yard at 10 AM, 1 PM, and 4 PM. Map out the full sun (6+ hours), part sun (3-6 hours), and full shade areas.
- What’s your soil like? Dig a hole. Is it heavy clay that holds water like a bowl? Is it sandy and dry? This dictates your plant choices.
- How big are you going? You don’t have to nuke your whole lawn on day one. Start with a 10×10 foot island bed. Or, if you’re feeling brave, kill the whole front yard.
Yard Size Decision Tree:
- Small Yard / Apartment Balcony: Focus on pots and raised beds stuffed with dense, nectar-rich blooms.
- Medium Suburban Yard: Carve out curved borders along your fences, or replace the classic foundation planting bushes with a native shrub border.
- Large Yard / Acreage: You can go all-in on a true wildflower meadow or convert your unused side yard into a prairie strip.
Step 2: Prepare (The Hard Part)
If you have existing grass, you have to kill it. But please, put the Roundup down. Chemicals completely defeat the purpose of a pollinator haven.
You are going to use the Sheet Mulching Method. It’s cheap, it’s effective, and it builds soil health.
Here is exactly how to do it:
- Mow it down: Cut your grass as short as your mower will go.
- Soak it: Water the area heavily.
- Cardboard time: Lay down overlapping pieces of plain brown cardboard (remove all tape and staples!). Make sure there are no gaps where grass can sneak through.
- The Blanket: Soak the cardboard again. Then, cover it with 4 to 6 inches of high-quality topsoil or compost.
- Wait: Let it sit for 4 to 6 weeks. The grass underneath will suffocate and decompose, turning into rich earthworm food.
Step 3: Plant (The Fun Part)
Now you have a blank canvas of beautiful, weed-free soil.
You have two choices here: Plugs (small starter plants) or Seeds.
- Use plugs if: You are starting in the spring, you want instant gratification, and you are dealing with aggressive weeds. Plugs establish much faster.
- Use seeds if: You have a massive area to cover, you are on a strict budget, and you don’t mind waiting a year for the real magic to happen. Fall is actually the best time to sow wildflower seeds, as many need a period of cold stratification to germinate.
Regional Plant Palettes (The Secret to Success)
This is where most blogs fail you. They tell you to plant Milkweed and Coneflower. But a plant that thrives in the humid swamp of Florida will absolutely croak in the dry, alkaline dirt of Arizona.
To outsmart the system, you need pollinator-friendly plants that actually belong in your specific neighborhood. Here are curated starter lists for five major U.S. regions.
1. The Northeast
Characterized by cold winters, warm summers, and acidic soils.
- Spring: Wild Geranium (Geranium maculatum), Eastern Red Columbine.
- Summer: Butterfly Weed (Asclepias tuberosa), New England Aster, Bee Balm (Monarda).
- Fall: Blue-stemmed Goldenrod, Smooth Aster.
- Native Grass: Little Bluestem.
2. The Southeast
Characterized by long, hot, humid summers and mild winters. Needs tough plants that can handle the heat.
- Spring: Wild Blue Phlox, Crimson Clover (great cover crop).
- Summer: Swamp Milkweed (Asclepias incarnata), Black-eyed Susan, Purple Coneflower.
- Fall: Blanket Flower (Gaillardia), Aromatic Aster.
- Native Grass: Switchgrass.
3. The Midwest
The heartland. Rich prairie soils, hot summers, freezing winters.
- Spring: Prairie Smoke, Wild Indigo.
- Summer: Pale Purple Coneflower, Joe-Pye Weed, Blazing Star (Liatris).
- Fall: Prairie Blazing Star, Showy Goldenrod.
- Native Grass: Prairie Dropseed (arguably the most beautiful native grass in existence).
4. The Southwest
Dry, arid, extreme heat. Water conservation is the name of the game here.
- Spring: Desert Marigold, Penstemon (Parry’s or Firecracker).
- Summer: Apache Plume, Autumn Sage.
- Fall: Goodding’s Verbena, Desert Zinnia.
- Native Grass: Blue Grama, Muhly Grass.
5. The Pacific Northwest
Mild, wet winters and dry, moderate summers. Think woodland edges and coastal scrub.
- Spring: Pacific Bleeding Heart, Camas.
- Summer: Yarrow, Douglas Aster, Nodding Onion.
- Fall: Goldenrod, Oregon Grape (evergreen).
- Native Grass: Roemer’s Fescue.
Pro Tip: When buying, always look for the scientific names in parentheses. Plant nurseries sometimes use confusing common names, but the Latin name never lies.
The Maintenance Mini-Calendar: Busting the “No Maintenance” Myth
Let’s address the elephant in the room.
People sell low-maintenance rewilding as a “set it and forget it” solution. That’s a lie. While it requires significantly less work than a lawn (no weekly mowing, no fertilizing, no watering every day), it is not zero work.
Think of it this way: A lawn requires relentless, boring, repetitive maintenance. A rewilded garden requires strategic, seasonal attention.
Here is what your first three years will actually look like.
Year 1: The Establishment Phase
Your main job this year is making sure your baby plants survive and outcompete the weeds.
- Spring: Weekly weeding. Yes, weekly. Your native plants are putting all their energy into growing deep roots right now. They can’t compete with fast-growing annual weeds yet. Pull weeds before they go to seed.
- Summer: Watering. If it doesn’t rain, give your new plants a deep soak once a week. You want the roots to chase the water deep underground.
- Fall: Do not cut it down! Leave all the dead foliage and seed heads standing. This provides winter shelter for overwintering insects.
- Winter: Dream and plan. Do nothing. Let the snow cover the stems.
Year 2: The Growing Pains
This is the transition year. The roots are established, but the canopy isn’t fully closed yet.
- Spring: Bi-weekly weeding. You’ll notice a huge drop in weeds this year. Add a 2-inch layer of untreated wood chip mulch around the base of your plants to suppress the rest.
- Summer: Spot watering. Only water if there is a severe, prolonged drought. Your plants should be mostly self-sufficient now.
- Fall: Collect seeds. If you want to expand your meadow next year, grab some dried seed heads and sprinkle them in bare spots.
- Winter: Again, do nothing. Grab a hot cocoa and watch the birds forage in the seed heads.
Year 3: The Reward Phase
This is where the magic happens. The plants form a thick, weed-suppressing mat. You are now just a steward, not a laborer.
- Spring: One light weeding pass. You might pull a few dandelions or thistles, but for the most part, your native plants will choke out the invaders.
- Summer: Zero watering. Seriously.
- Fall: Leave it be.
- Late Winter (February/March): The Annual Chop. Right before the new spring growth starts, take hedge clippers and chop everything down to about 4 inches tall. Leave the chopped debris on the ground—it will break down and feed the soil. That’s it. That is your “mowing” for the entire year.
Measuring Success: How to Prove It’s Working
One of the coolest things about rewilding is that it turns your yard into a living laboratory.
You don’t just have to hope you’re helping pollinators. You can actually track your impact. This is what elevates a regular garden into a true ecological project.
Here is how you measure your success and turn your yard into an interactive experience.
The 15-Minute Pollinator Count
You don’t need a degree in entomology to do this. You just need a notebook, a pen, and 15 minutes of your time.
- Pick a patch: Choose a 3×3 foot section of your rewilded garden.
- Set a timer: 15 minutes.
- Count: Every time a bee, butterfly, moth, hoverfly, or beetle lands on a flower in that patch, make a tally mark. (Don’t worry about identifying the exact species yet, just count the interactions).
- Log it: Note the date, time, and weather.
Do this once a month from May through September. By Year 3, you will be blown away by how much those numbers have skyrocketed compared to Year 1.
Put Your Phone to Good Use
Technology is a rewilders best friend. Instead of doom-scrolling, use your smartphone to become a citizen scientist.
- iNaturalist: Take a photo of any insect or plant in your yard and upload it. The app’s AI and a community of experts will help you identify it. Your data actually gets added to global biodiversity databases used by real scientists.
- Seek by iNaturalist: This is a great kid-friendly version. You just point your camera at a bug or leaf, and it instantly tells you what it is. It is incredibly satisfying.
- The Great Sunflower Project: You can register your rewilded garden as a safe habitat and submit your pollinator counts to help researchers track bee populations across the country.
Look for the “Micro” Successes
Numbers are great, but don’t forget to look for the small, quiet victories.
- Did you see a Monarch caterpillar chewing on your milkweed for the first time? Success.
- Did you notice a ground-nesting bee digging a tiny hole in the bare dirt between your plants? Huge success. (This is why you shouldn’t over-mulch! Many native bees live in the dirt).
- Did a flock of goldfinches spend the afternoon eating your aster seeds in February? Absolute success.
Final Thoughts: You Are Building a Bridge
Taking the leap into rewilding garden 2026 can feel intimidating.
You might get a side-eye from the neighbor who spends every Saturday sweating behind a gas mower. You might have a patch of bare dirt that looks a little rough for a few months in year one.
But I promise you, the payoff is incredible.
When you plant native plants for pollinators, you aren’t just decorating your yard. You are building a bridge. You are connecting your little patch of earth to the wild spaces around it, creating a corridor where exhausted bees can find nectar, where struggling butterflies can lay their eggs, and where birds can find a feast.
You are taking a stand and saying, “My yard is going to be part of the solution.”
So grab some cardboard, pick out your regional wildflowers, and get dirty. The bees are waiting for you to catch up.