Let’s be brutally honest for a second about the “rewilding” trend.
A few years ago, we all went crazy for wildflower meadows. We ripped up our lawns, tossed out a million seeds, and waited for that perfect, chaotic, Cottagecore aesthetic to take over our yards.
But you know what usually happened?
By August, it didn’t look like an English countryside. It looked like a neglected vacant lot. The aggressive weeds choked out the flowers, the design was non-existent, and honestly, it was a bit of an eyesore. Plus, at the end of the day, you couldn’t eat any of it.
Enter 2026.
Gardeners are pivoting hard. We still want nature, but we are craving order. We want productivity without sacrificing aesthetics. We want our yards to look like they were designed by an architect, but we still want to walk outside and snip a pepper for dinner.
Enter the botanical bento.
It’s the biggest shift in structured garden design in a decade, and it’s about to completely change the way you look at your raised beds.
The Problem with Wildflower Chaos & The Bento Solution
The problem with the “throw-seeds-and-pray” method is that it lacks intention. Nature is messy, but beautiful gardens require a guiding hand.
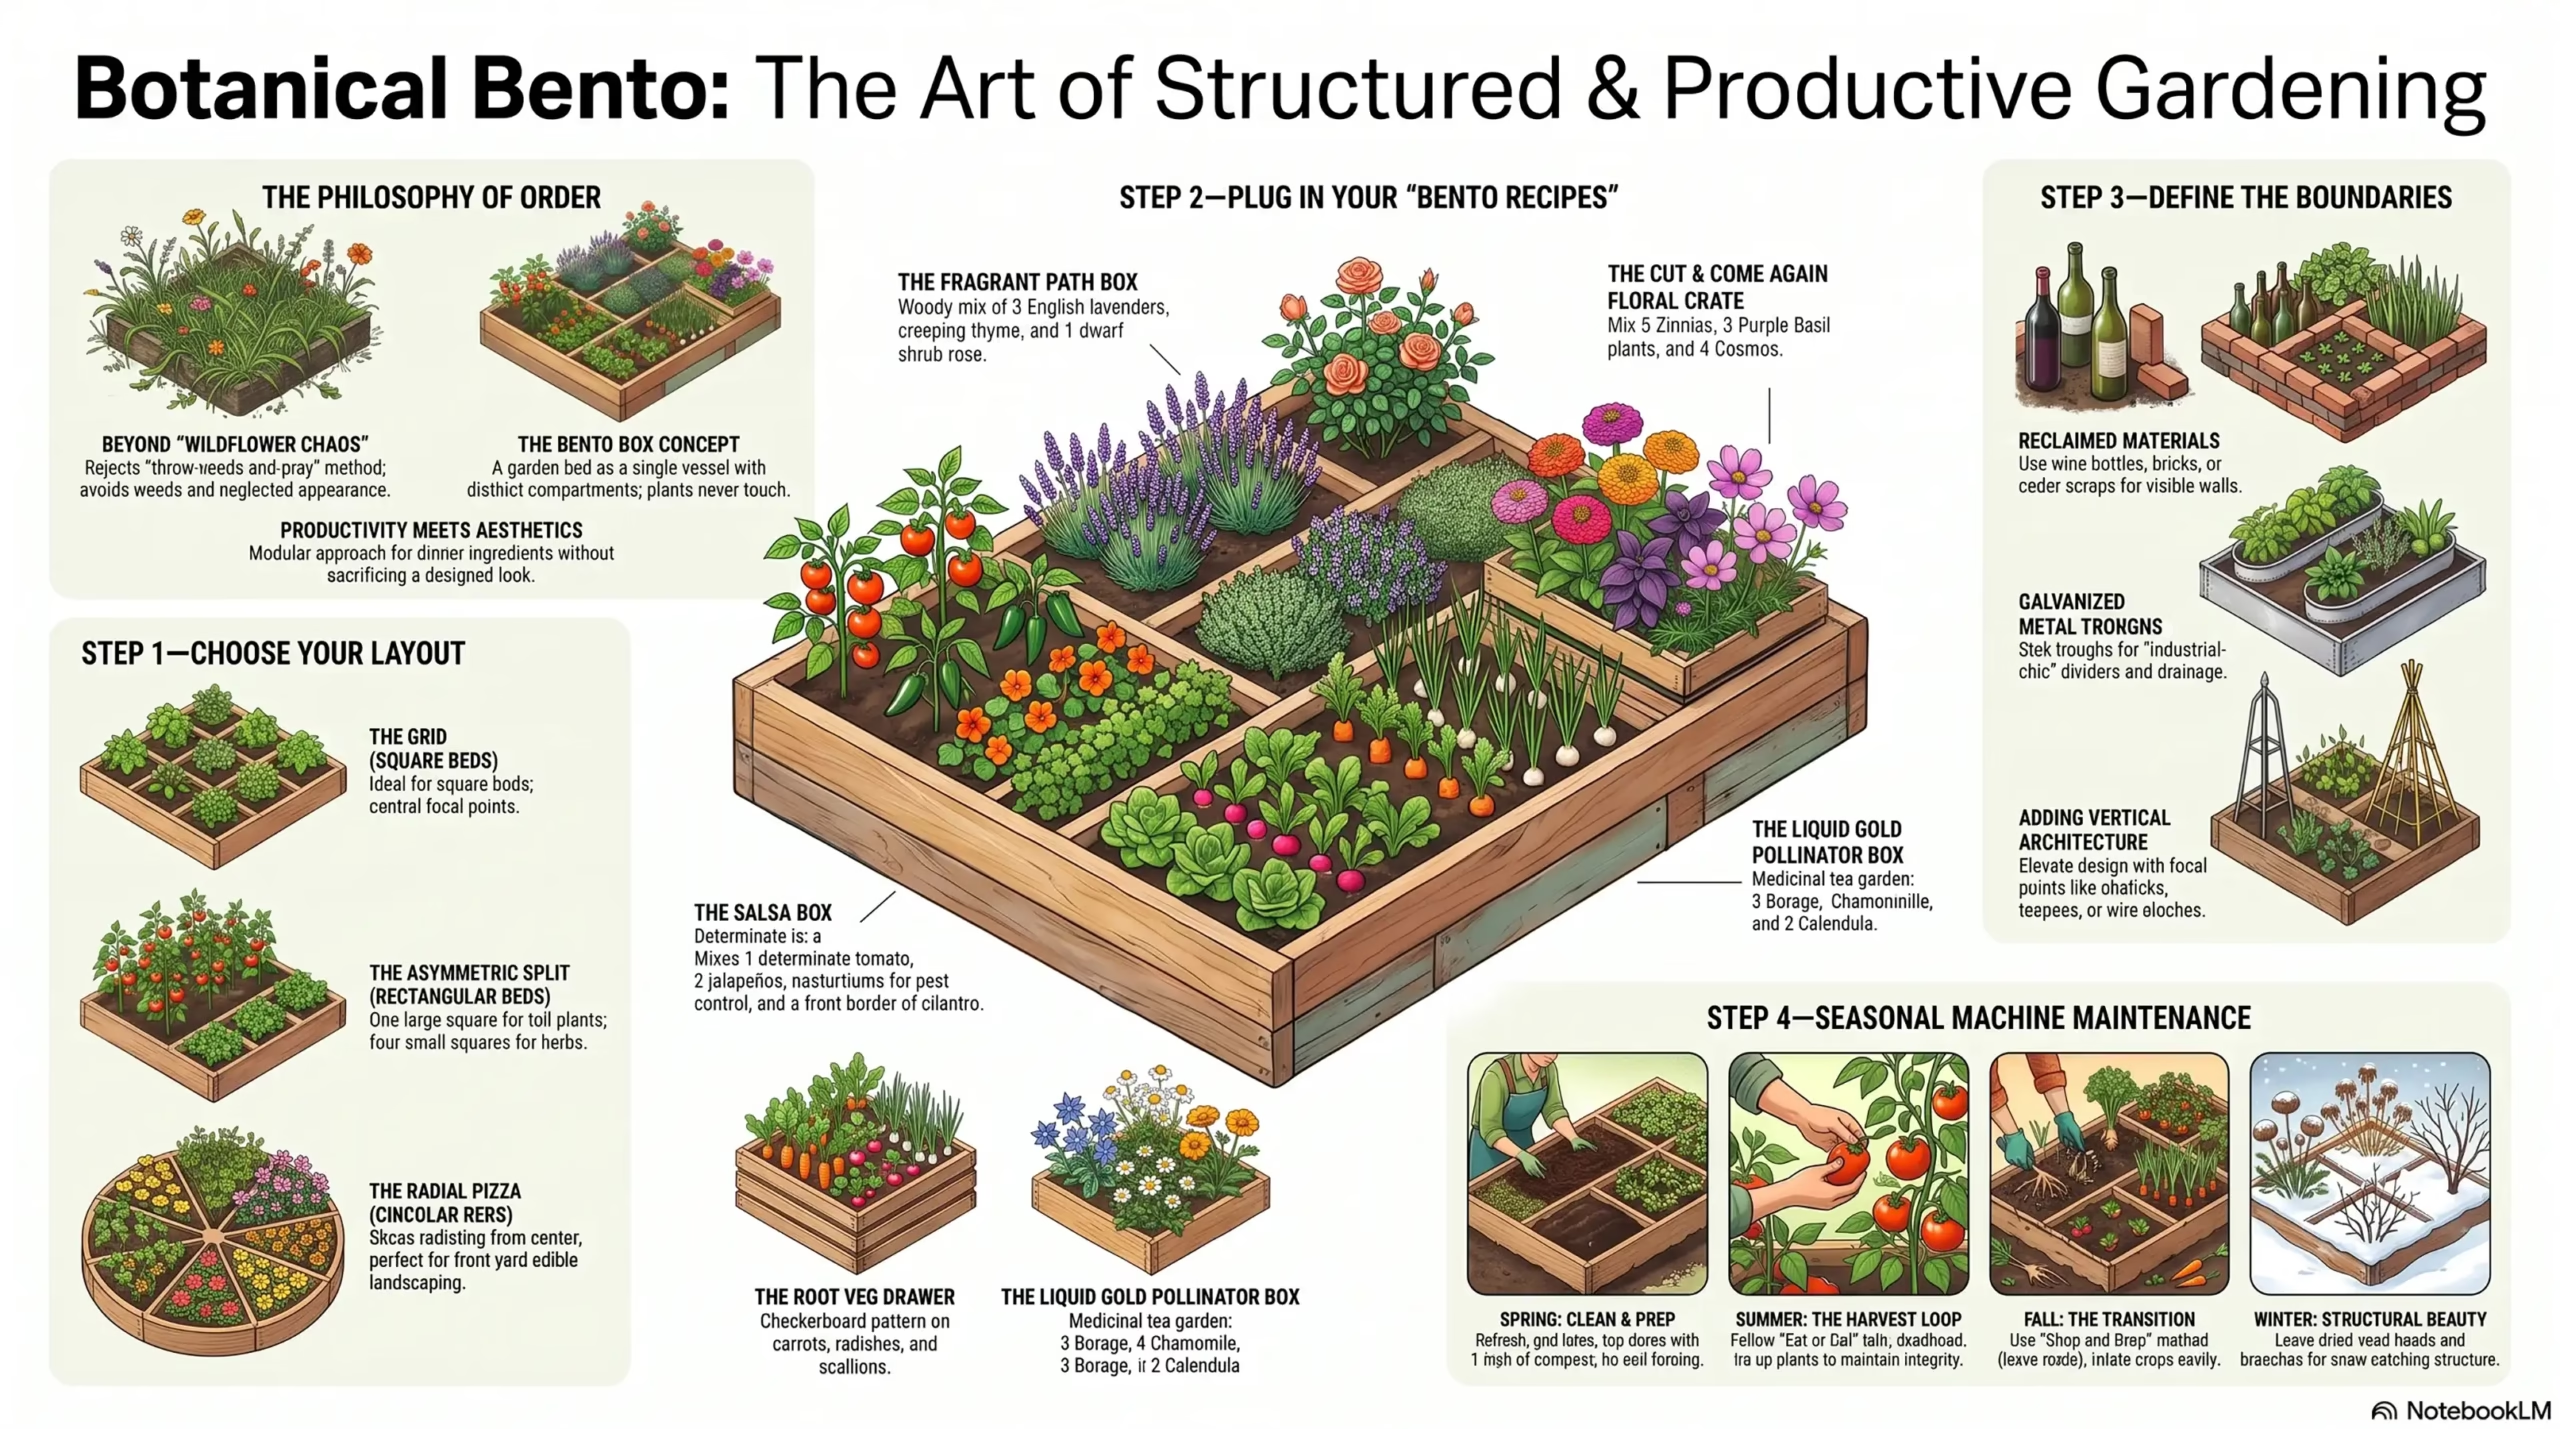
The botanical bento trend fixes this by borrowing a brilliant concept from Japanese cuisine: the bento box.
Think about a bento box. It’s a single, contained vessel. But inside, it’s divided into neat, distinct compartments. You have your rice, your pickled vegetables, your protein, and your fruit. Nothing touches unless you want it to. It’s visually satisfying, highly organized, and perfectly portioned.
Apply this to your garden, and you get magic.
Instead of one giant, chaotic raised bed where tomatoes are strangling the basil and the weeds are hiding, you divide the space into modular “rooms.” This is the ultimate evolution of garden room design, scaled down to fit into a 4×8 foot cedar box.
It gives your eye a place to rest. It makes maintenance a breeze. And it allows you to seamlessly mix edibles and ornamentals without it looking like a messy farm patch. It is, quite frankly, the smartest way to garden.
The Bento Box Design Method
You don’t need a massive estate to do this. Whether you have a single raised bed or a sprawling in-ground plot, the Bento Method works.
The secret is dividing your space into 4 to 6 distinct compartments. Here is how to lay it out:
The Grid Layout (Best for Square Beds)
Imagine a tic-tac-toe board. You divide your bed into 9 equal squares (though you might leave the center square empty for a structural element like a birdbath or an obelisk trellis).
- Best for: Narrow raised beds against a fence.
The Asymmetric Split (Best for Rectangular Beds)
Don’t be afraid of odd numbers. Divide a 4×8 bed into one large 4×4 square on the left, and four 2×2 squares on the right.
- Best for: Separating tall plants (like tomatoes in the big box) from low, tidy plants (like herbs in the small boxes).
The Radial Pizza Layout (Best for Circular Beds)
Draw lines from the center to the edges, creating “slices” of pie.
- Best for: Adding a strong focal point to a front-yard edible landscaping bed.
Naming Your Compartments
Don’t just think of them as “Box 1” and “Box 2.” Give them a job title. When you name a space, you design it with more intention.
- The Herb Spiral Crate
- The Cutting Flower Box
- The Root Veg Drawer
- The Nightshade Palace
5 Winning Plant Combinations (Your “Bento Recipes”)
To make a botanical bento work, the plants inside each compartment need to share the same water, sun, and soil needs. They also need to look good together.
Here are 5 pre-designed “bento recipes” ready to plug into your structured layout.
Recipe 1: The Salsa Box
This is a highly productive, heat-loving compartment that looks incredibly lush.
- The Plants: 1 determinate tomato plant (like ‘Roma’), 2 jalapeño pepper plants, 1 sprawling nasturtium (for edible flowers and pest control), and a border of cilantro.
- Spacing: Tomato in the back center (24 inches). Peppers flanking it (18 inches). Nasturtium in the front corner. Cilantro sown in a tight row along the very front edge.
- Succession Planting: Cilantro bolts in the heat. When it dies back in mid-summer, pull it and sow a new crop of bush beans in that same front row to fix nitrogen for the tomatoes.
Recipe 2: The Fragrant Path Box
This compartment is designed to be placed right next to a walkway so you brush against it and release incredible scents. It blurs the line between a formal vegetable garden and an English perennial border.
- The Plants: 3 English lavender plants, a low hedge of creeping thyme, and 1 dwarf shrub rose (like ‘Knock Out’ or a David Austin variety).
- Spacing: Rose in the back center. Lavender in a row in front of the rose (18 inches apart). Thyme creeping over the front edge of the box.
- Succession Planting: This is a permanent, woody compartment. No succession needed. Just trim the lavender after it blooms to keep it tidy.
Recipe 3: The Cut & Come Again Floral Crate
Why buy grocery store bouquets when you can grow your own? This box mixes ornamental flowers with edible foliage for endless arranging.
- The Plants: 5 Zinnias (tall varieties like ‘Benary’s Giant’), 3 Purple Basil plants, and a background of 4 Cosmo plants.
- Spacing: Cosmos in the very back (12 inches). Zinnias in the middle row (12 inches). Purple basil filling in the front gaps (10 inches).
- Succession Planting: Zinnias and cosmos will bloom until frost if you keep cutting them. Every 3 weeks in early summer, sow a few more zinnia seeds in any empty gaps to replace older plants that eventually tire out.
Recipe 4: The Root Veg Drawer
Root vegetables have beautiful, lacy foliage that looks fantastic when massed together in a tight, defined space.
- The Plants: Carrots, Radishes, and Scallions (green onions).
- Spacing: Create a checkerboard pattern. Alternate a scallion with a carrot. Tuck the radish seeds in between them.
- Succession Planting: This is the ultimate interplanting trick. Radishes germinate in 3 days and are ready to pull in 25 days. When you pull the radish, it instantly frees up space for the slower-growing carrots to expand. Sow a new row of radishes every 2 weeks.
Recipe 5: The Liquid Gold Pollinator Box
This box is dedicated entirely to plants that can be brewed into teas or used medicinally, wrapped in a neat, structured package.
- The Plants: 3 Borage plants, 4 Chamomile seedlings, and 2 Calendula plants.
- Spacing: Calendula in the back (12 inches). Chamomile in the middle (8 inches). Borage in the front corners (they get big and floppy, so let them drape over the edge).
- Succession Planting: Chamomile is a heavy self-seeder. Leave a few flower heads to drop seeds at the end of the season, and you’ll have free chamomile popping up next spring.
Hardscaping on a Budget: Creating the Divisions
A botanical bento only works if you can see the divisions. If you just plant things in rows, it just looks like a standard garden. You need physical barriers to define the “boxes.”
But buying custom metal dividers or expensive stone edging can cost a fortune. Here is how to do it on a strict budget using reclaimed materials.
1. The Wine Bottle Wall
This is a classic, stunning look. Start saving (or asking friends to save) empty wine bottles.
- How to do it: Bury them upside down, neck-deep, side-by-side in the soil. They create a beautiful, colored glass wall that catches the sunlight and perfectly separates your herbs from your tomatoes.
2. Reclaimed Brick Pathways
Go on Facebook Marketplace or Craigslist and look for “free brick.” People are always trying to get rid of old patios.
- How to do it: Lay them flat in the soil to create tiny, 6-inch pathways between your compartments. You don’t need to lay them in mortar. Just press them firmly into the dirt. It instantly makes a raised bed look like a miniature estate garden.
3. Cedar Scrap Borders
If you build your raised beds out of cedar, you usually have offcuts left over.
- How to do it: Cut 1×2 or 2×2 scraps to the exact width of your bed. Sink them vertically into the soil, flush with the top of your soil line, to create clean, wooden grid lines. They will slowly weather to a beautiful silver-grey.
4. Galvanized Metal Troughs
For a more industrial-chic vibe, buy cheap galvanized livestock watering troughs.
- How to do it: Set them inside your larger raised bed. Fill them with soil, and plant your bento compartments directly inside the troughs. This is incredible for plants that need drastically different drainage, like rosemary, which hates wet feet.
Adding Vertical “Architecture”
A flat garden is boring. To elevate your bento design, add small vertical elements inside specific compartments.
- Use a rusted metal obelisk in the center of the Salsa Box for the tomatoes to climb.
- Tie three bamboo stakes together in a teepee shape in the Cut Flower Box for climbing sweet peas.
- Stick a rusty old birdcage or a vintage wire cloche in the Herb Box to act as a sculptural focal point when nothing is blooming.
From Plan to Plate: A Seasonal Schedule
The beauty of the botanical bento method is that it turns your garden into a purpose-driven machine. You aren’t just growing “stuff.” You are growing specific ingredients for specific outcomes.
Here is how to maintain and harvest your structured beds through the seasons.
Spring: The Setup
- Clean the Grid: If you used bricks or wood dividers, spring is the time to pull out any dirt or debris that slipped over the edges during winter. Make those lines crisp again.
- Top Dress: Don’t turn the soil in your bento boxes (it destroys the microbiome). Just add a 1-inch layer of high-quality compost to each compartment.
- Plant the Cool Boxes: Fill your Root Veg Drawer and your Liquid Gold Pollinator Box with cool-season seeds as soon as the soil can be worked.
Summer: The Harvest Loop
- The “Eat or Cut” Rule: In a structured garden, a messy plant ruins the aesthetic. If a tomato gets too heavy and flops, tie it up immediately. If a zinnia fades, deadhead it that same day.
- Harvest from the outside in: For your Salsa Box and Herb boxes, always harvest the outer leaves or stems first. This forces the plant to grow inward, maintaining a tight, neat shape within its designated box.
- Weed Patrol: Because the beds are divided, weeding is psychologically easier. Just tackle one “bento box” at a time while you’re harvesting from it. Five minutes a day keeps it flawless.
Fall: The Transition
- The Chop Drop: When your summer compartments (like the Salsa Box) finish producing, don’t yank the plants out by the roots. Use loppers to cut the stems at the soil line. Leave the roots in the ground to decompose and feed the soil microbes.
- Swap the Compartments: Plant garlic bulbs in your Root Veg Drawer. Sow winter kale in the spot where your spring cilantro was. The bento grid makes crop rotation stupidly easy—you just assign a new crop to a new box!
Winter: The Rest
- Protect the Structure: If you live in a wet climate, ensure your wooden dividers aren’t sitting in pooling water.
- Visual Interest: Leave the dried seed heads of your flowers and the bare branches of your roses standing. A dusting of snow on a highly structured, geometric garden bed is one of the most beautiful sights in winter.
Why This Trend is Here to Stay
The botanical bento isn’t just a cute Pinterest fad. It solves real problems.
It cures the overwhelm of traditional gardening. It satisfies our deep human desire for order and geometry, while still feeding our desire to connect with nature and grow our own food. It proves that you don’t have to choose between a yard that looks like a magazine cover and a yard that puts food on your table.
You can have both.
So this weekend, grab some reclaimed wood, sketch out a simple grid, and start dividing your space. Once you see how incredibly satisfying it is to harvest a perfectly organized “Salsa Box,” you’ll never go back to chaotic gardening again.