Table of Contents
Welcome back to Plant It! If you’re on the hunt for a houseplant that is equal parts low-maintenance roommate and natural first-aid kit, let us introduce you to the one and only Aloe Vera. This spiky, sculptural succulent has been prized for thousands of years, and it’s just as happy sitting on a sunny windowsill today as it was in ancient Egyptian gardens.
With its plump, architectural leaves and that famous soothing gel hiding inside, Aloe Vera looks like it belongs in a spa rather than on your kitchen counter. But don’t let its exotic looks fool you. Aloe is refreshingly drama-free compared to some of its houseplant cousins… as long as you resist the urge to shower it with love (read: water) every day.
Aloe’s biggest quirk? It would honestly rather be neglected than fussed over. Overwatering is the number one way to send this desert native into a slow, mushy decline. In this comprehensive guide, we’ll walk through exactly how to care for your Aloe Vera plant indoors, how to spot trouble before it’s too late, and how to turn one plant into a whole windowsill full of pups.
Aloe Vera Profile Quick Look
| Feature | Details |
| Common Name | Aloe Vera, True Aloe, Medicinal Aloe |
| Botanical Name | Aloe barbadensis miller |
| Plant Type | Succulent perennial |
| Mature Size | 1 to 2 feet tall and wide indoors |
| Sun Exposure | Bright, direct to bright, indirect sunlight |
| Soil Type | Sandy, gritty, fast-draining |
| Soil pH | Slightly acidic to neutral (6.0 to 7.5) |
| Toxicity | Mildly toxic to cats and dogs if ingested |
| Native Area | Arabian Peninsula, naturalized across Africa |
Fun Fact: A Built-In Water Tank
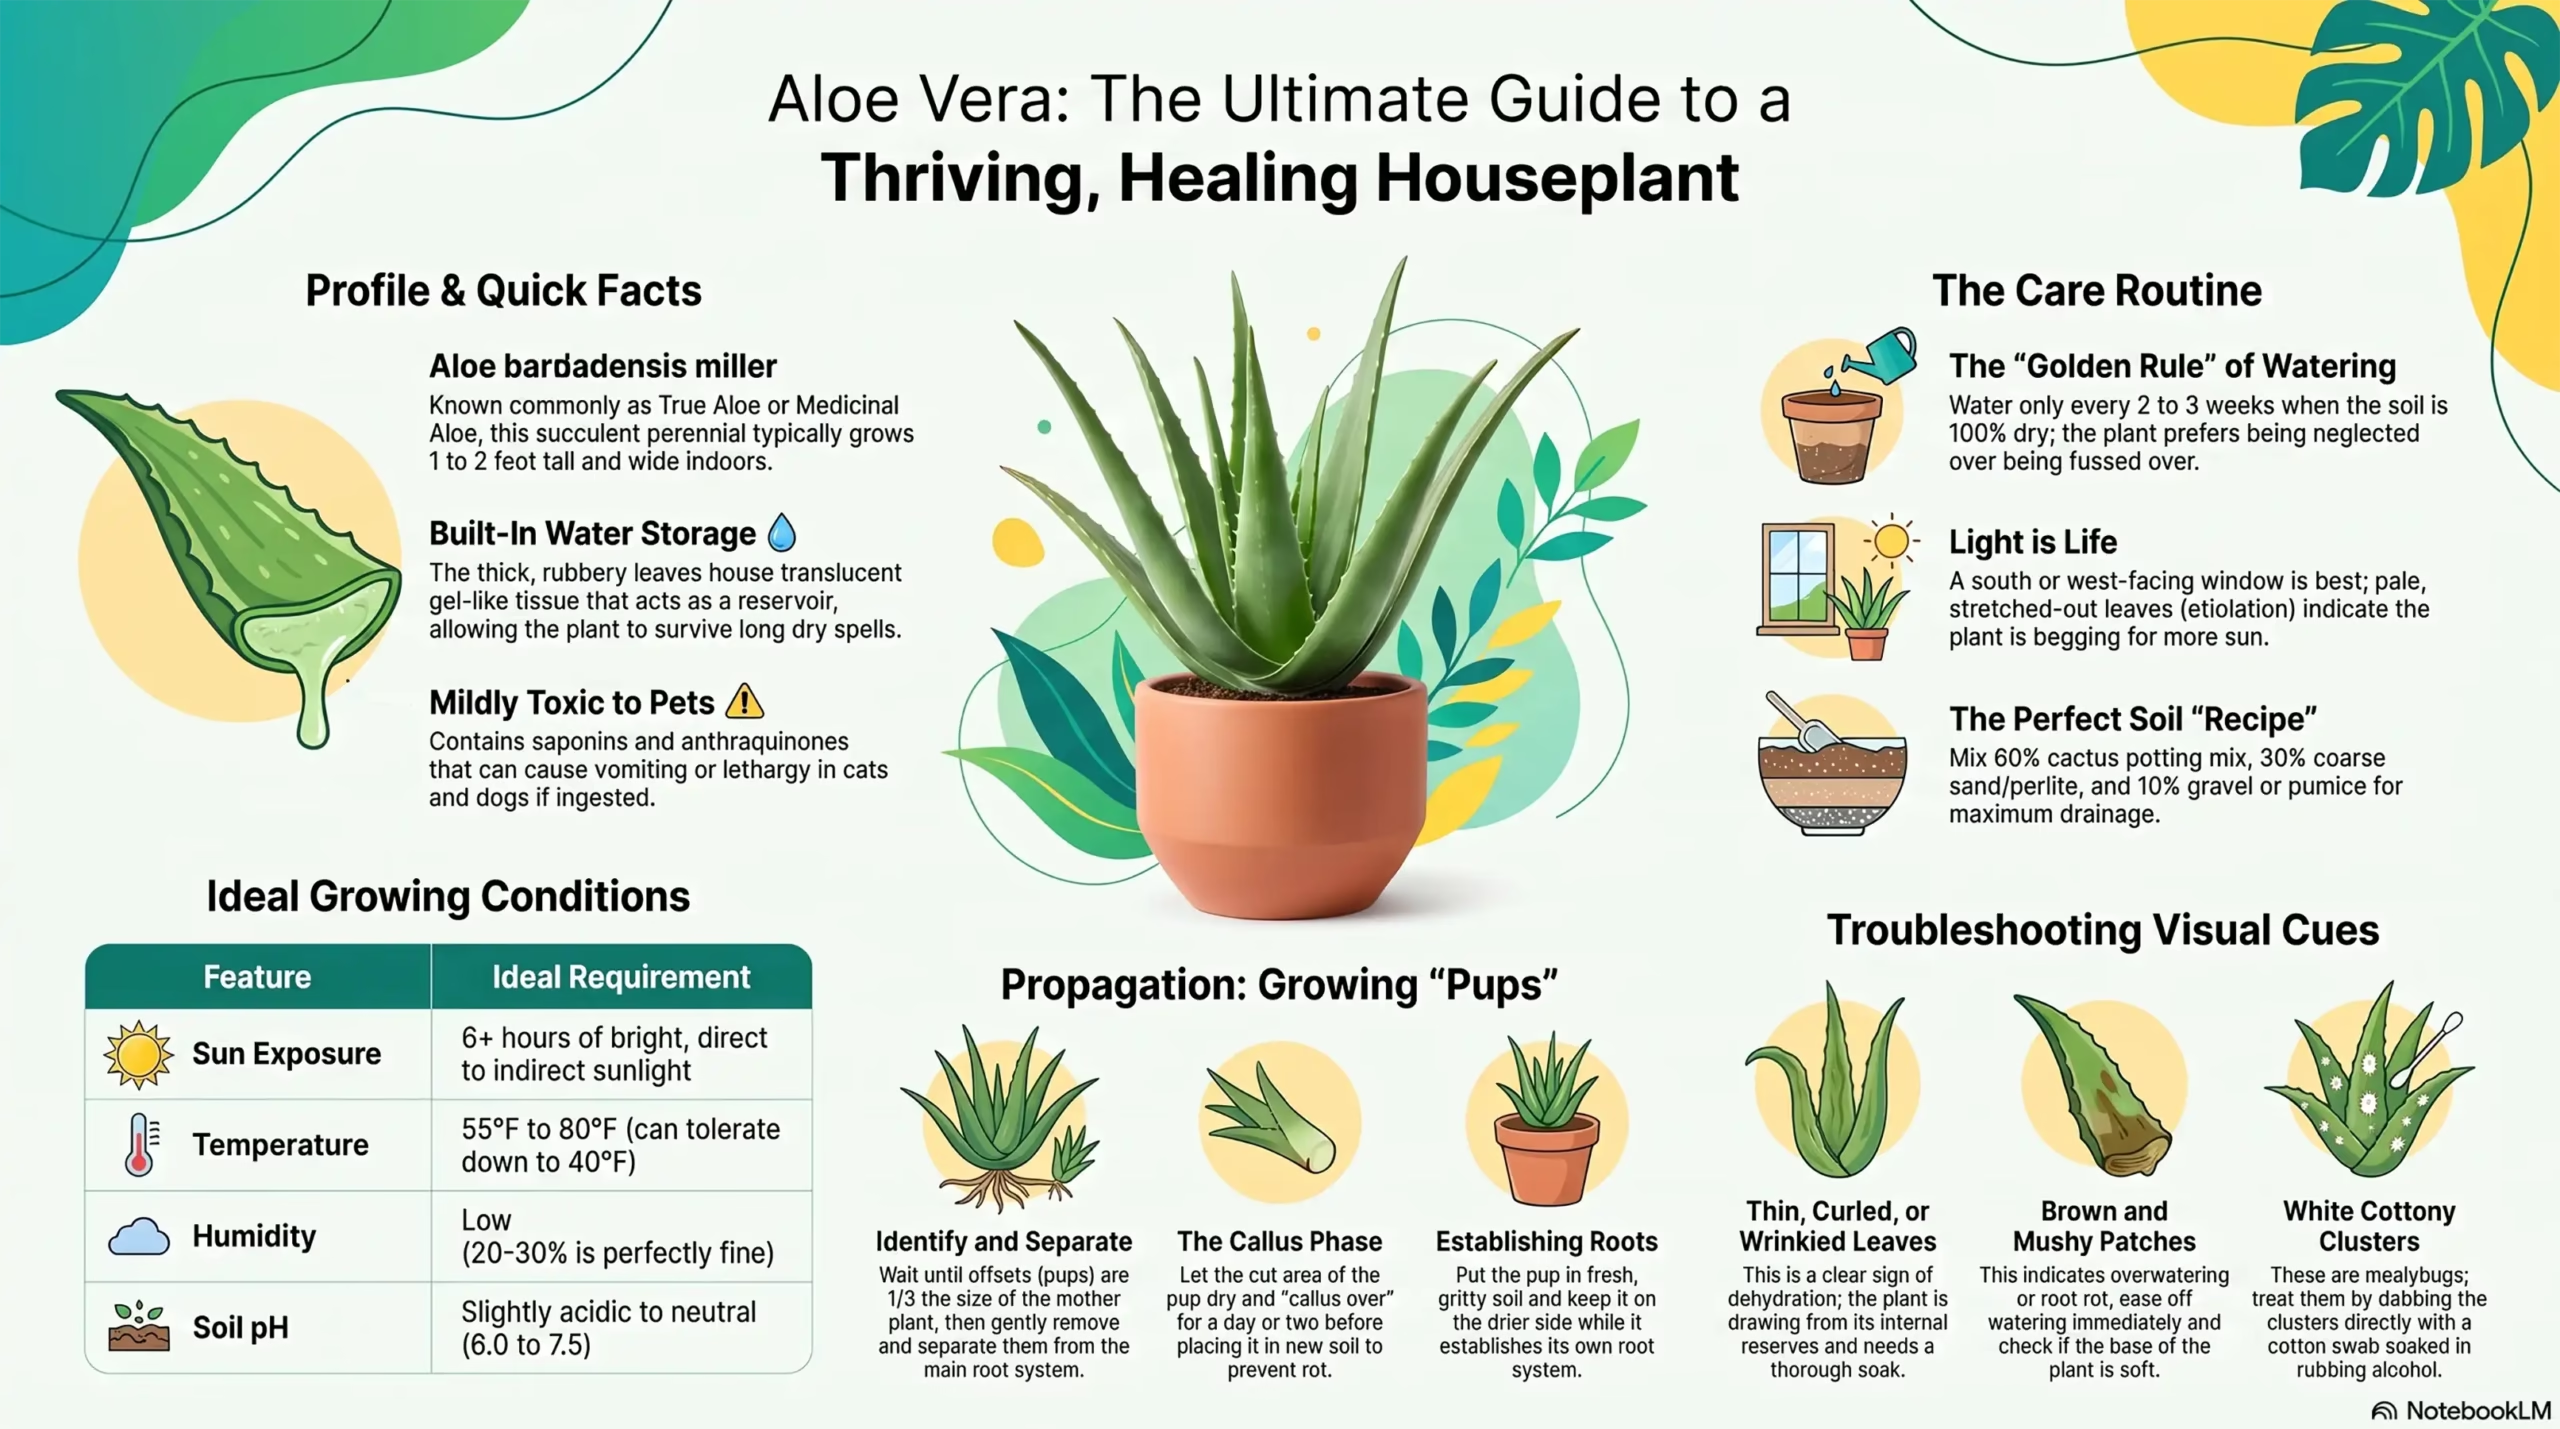
Aloe Vera’s thick, rubbery leaves aren’t just for looks; they’re actually water storage tanks! Beneath that tough outer skin is a layer of translucent, gel-like tissue that the plant fills up whenever water is available, then slowly draws from during dry spells. This is why Aloe leaves feel firm and plump when the plant is happy, and start to look thin, wrinkled, or deflated when it’s thirsty. It’s also exactly why overwatering is so dangerous: those water-storage cells can only hold so much before they rupture and rot from the inside out.
A Beginner’s Tips for Success
If you just brought home your first Aloe Vera, here’s the golden rule: when in doubt, don’t water it.
Unlike leafy tropical plants that sulk and drop leaves the moment they’re moved, Aloe is remarkably chill about relocation. It won’t throw a tantrum over a new home. Its real enemy is a well-meaning owner who waters on a strict daily or weekly schedule out of habit.
Resist the urge to check on it too often. Give it a bright spot, water only when the soil is completely dry, and otherwise leave it alone. Aloe genuinely thrives on benign neglect.
How to Plant
Because Aloe Vera is so sensitive to soggy roots, your setup matters more than almost anything else you’ll do for this plant. Choose a pot with drainage holes, size it just slightly larger than the current root ball, and pick a spot with strong, consistent light before you even start filling the pot with soil.
Essential Aloe Vera Care
To keep your Aloe plump, healthy, and pup-producing, you need to recreate its native arid, sun-baked habitat.
Light: Bright and Unapologetic
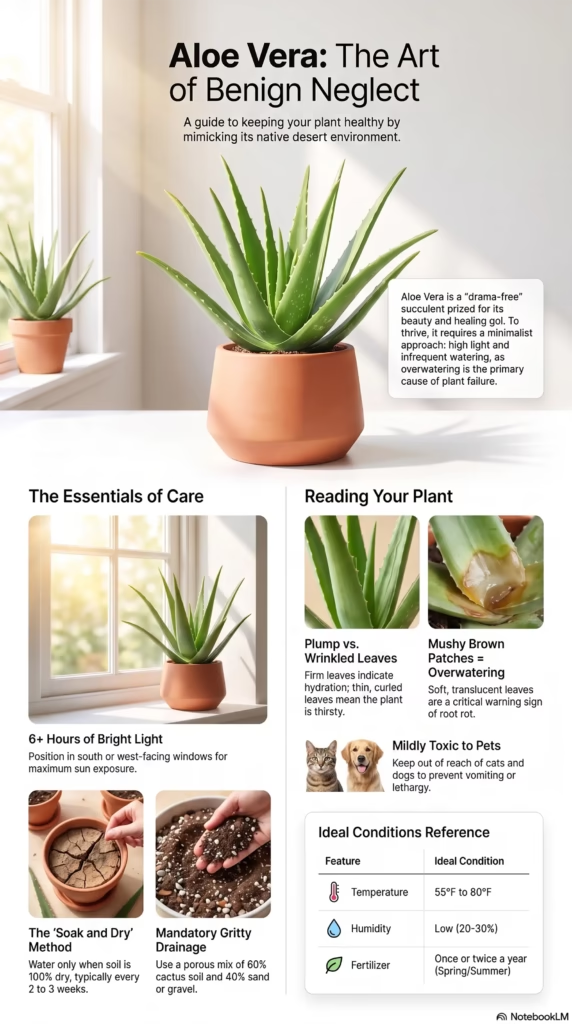
If you’re wondering how to keep your Aloe Vera plant healthy, light is step one. Aloe wants a minimum of 6 hours of bright light a day, and it genuinely enjoys some direct sun.
A south-facing or west-facing window is the sweet spot. If your Aloe’s leaves are looking pale, flat, or stretched out and reaching toward the glass (a process called etiolation), it’s begging for a brighter location.
Soil Needs
The best potting soil mix for Aloe Vera needs to drink up water fast and never stay soggy. Regular potting soil holds far too much moisture and will quickly cause rot.
Create a fast-draining, gritty blend:
- 60% cactus or succulent potting mix
- 30% coarse sand or perlite for drainage
- 10% small gravel or pumice for extra aeration
Water: Less Is More
Aloe Vera gives clear visual cues when it’s thirsty: the leaves will start to look thin, slightly curled, or wrinkled instead of firm and plump.
Let the soil dry out completely between waterings, then soak it thoroughly until water runs freely from the drainage holes, and let the pot drain fully before returning it to its saucer. Never let the pot sit in standing water. In most homes, this means watering every 2 to 3 weeks, though it will vary with light and season.
Temperature and Humidity
Aloe Vera loves a warm, dry environment. Keep it in a range of 55°F to 80°F, and know that it can tolerate brief dips as low as 40°F, though anything colder will cause damage.
Unlike many houseplants, Aloe has zero interest in high humidity. Standard indoor air, even as low as 20-30% humidity, suits it perfectly fine, so there’s no need for a humidifier or misting.
Fertilizer
Aloe Vera is a light feeder and does not need much supplemental nutrition. Use a balanced, diluted liquid fertilizer (such as a 10-10-10 blend) mixed at half strength, applied just once or twice during the growing season in spring or early summer. Skip fertilizing entirely in fall and winter.
Dazzling Types of Aloe
While true Aloe Vera is the classic choice, the wider Aloe family offers plenty of variety:
- Aloe Vera (barbadensis miller): The classic medicinal variety, with tall, upright, pale green leaves and the famous soothing gel.
- Aloe ‘Blue Elf’: A compact hybrid with striking blue-green leaves and a tidy, rosette shape, perfect for small spaces.
- Aloe Aristata (Lace Aloe): A smaller, clustering variety with white speckled leaves and soft, tooth-like edges.
- Aloe ‘Christmas Carol’: A colorful cultivar with red-tinged teeth along its leaf edges that intensify in bright light.
Pruning and Propagating Your Aloe
Aloe doesn’t need regular pruning, but removing damaged or dying leaves keeps it looking its best. Simply cut brown or mushy leaves off at the base with clean, sharp scissors.
Learning how to propagate Aloe Vera pups is the easiest way to multiply your collection:
- Look for small offsets, or “pups,” growing at the base of the mother plant.
- Once a pup has grown to about a third the size of the parent, gently remove the whole plant from its pot.
- Carefully separate the pup from the main root system, keeping some roots attached to the pup if possible.
- Let the cut area callus over for a day or two in a dry spot before planting.
- Pot the pup in fresh, gritty succulent soil and keep it on the drier side while it establishes new roots.
Growing in Pots and Overwintering
- Drainage is Mandatory: Aloe Vera will not tolerate a pot without drainage holes. Unglazed terracotta is ideal, since it wicks away extra moisture.
- Repotting: Aloe grows slowly and typically only needs repotting every 2 to 3 years, or once pups have crowded the container. Size up by just 1 to 2 inches to avoid excess soil holding unused moisture.
Winter is Aloe’s natural rest period, and its needs shift accordingly.
- Move the plant to your brightest available window, since winter light is naturally weaker.
- Cut watering back significantly, allowing the soil to dry out fully and then waiting even longer before watering again.
- Keep it away from cold windowpanes and drafty doors.
- Do not fertilize at all during this dormant stretch.
Common Pests and Diseases
Aloe Vera is generally tough, but a few troublemakers can still show up.
- Mealybugs: Look for small, white, cottony clusters tucked into the base of the leaves. Treat by dabbing them directly with a cotton swab soaked in rubbing alcohol.
- Scale: Tiny, brown, shell-like bumps that cling to the leaves and sap the plant’s energy. Scrape them off gently and follow up with an insecticidal soap.
- Root Rot: By far the most common issue, caused almost entirely by overwatering or poor drainage. Affected roots turn dark and mushy, and the base of the plant may become soft.
The Rare Indoor Bloom
Does Aloe Vera flower? Yes, though it’s uncommon indoors and usually only happens once a plant is several years old and getting excellent light. A mature, thriving Aloe will send up a tall, slender flower spike topped with clusters of tubular yellow or orange blossoms. It’s a rare treat and a clear sign your plant is completely content with its environment.
Common Issues (Troubleshooting)
Why is My Aloe Vera Plant Turning Brown?
Brown, mushy patches almost always point to overwatering and are one of the most common Aloe Vera plant problems. If the leaves feel soft and discolored, ease off the watering schedule and check that the soil is draining properly.
Why is My Aloe Plant Turning Mushy?
Mushy, translucent leaves are a hallmark sign of root rot in progress. Remove the plant from its pot, trim away any blackened roots, let it dry out, and repot into fresh, dry succulent soil.
Why Are the Leaves Thin and Curling?
If the leaves look deflated, thin, or slightly curled, the plant is dehydrated and drawing down its internal water reserves. Give it a thorough soak and resume a less frequent watering routine going forward.